Showing posts with label how-to-tuesday. Show all posts

Monday, 23 April 2012

15 Tips for Using Pinterest


I mentioned last week that I would write up a guide to Pinterest, it seems like my Timeline and Blogging articles were popular so I might as well continue imparting my nerdy skills. If you are at all involved with crafts/design you will probably have heard of Pinterest, that is if you are not already a member. It's a website  where people share their taste via virtual pin boards, basically it's like bookmarking with pictures in a shared community. For designers its an amazing resource for two reasons, one it's fantastic for research and information; I've learned tons of new techniques for both crafts and computers since joining. Secondly it's as a way of sharing your own creations, I pin most of my blog posts and some of my etsy listings so my followers (and virally millions of others) can see them.  Even though it has one twentieth the users as Twitter it generates nearly the same referrals, which just shows you the power it has to generate traffic for yourr brand/website. I've been addicted since before Christmas (go here if you would like to follow me) so I've learned a few things along the way:

1. Set up an account;
For some weird reason the site is still invite only, but you can either request one when you go to Pinterest, or if you leave your email in the comments section I can send you an invitation.

2. Don't just repin; 
There are two ways to pin; either by repinning an item that someone else has pinned or by pinning something new to the site. After you've been on the site a while you will see lots of the same tutorials floating around, the community depends on people adding fresh items or it's gets stale very fast. Some of the hardcore Pinners say that you should contribute 1 new pin for every 5 that you repin. But I'm gonna be realistic and say that I do 1 for every 10, I see way too many cool things not to. You can install the pin button on your tool bar that makes pinning cool stuff from the internet really easy.  

3. Pin with the correct link; 
After a while you will notice that not everyone knows how to use Pinterest properly and that some images don't link to the proper site, as a user this is insanely headwrecking!! Please don't be one of those users. for instance if you are on a blog and you see a great post, don't just pin the whole site and click the picture you like, you have to click into the link of that individual blog post and then click your 'pin it' button. Otherwise other people will be brought to the main site rather than that specific post. I hate it when I see a pin for a fantastic tutorial and then I can't find the page. Another thing that people do is pin images directly from Googe images, giving that as a referral link rather than the website, leading people to a dead end, which is also really annoying and breaks the rules of Pinterest.

4. Find a lost pin;
If you get stuck in the above situation but you really want to find the source there is a way. Right click on the pin, then 'open the image in new tab', right click on that and 'save as'. Open up Google Images an drop the file into the search bar, it will then give you a list of sites that this image has appeared on (this is also a good way to see is anyone stealing your images online without permission).

5. Organise your brain and your browsing;
I used to use bookmarks but I really hated them as I always lost sites or forgot what I named them. Pinterest is fantastic for sorting out this kind of information. I have a borad for loads of helpful articles for selling online that includes loads of marketing tips that I can refer back to when I need them. The same goes for card making, sewing tips and cookery. Now when I sit down to make cards I take a look at my board first and scan for inspiration (just like I do with my scrap booking magazines). I also keep a cookery board, so if I can't think of anything to make for dinner I can take a peek at my board and see if anything takes my fancy. I use Pinterest as a place to store ideas until I need them. 


6. Add text to your image;
This is something I haven't quite gotten in the habit of doing yet, but I see it used a lot to great effect. If you are doing a blog post that you intend to pin, or something useful that you would expect others to pin then add text to one of the images. For instance for my blogging article I made images to go with the piece and included the phrase '20 blogging tips' in the picture. There is a pin description, but sometimes people leave this blank, for these instances your pin will still have an explanation embedded into the image. Another tip I read was also to include your website address in the image. This has two benefits; 1. If the link gets lost along the way or someone pins it incorrectly then people can still find your site. 2. It creates brand awareness on Pinterest, if your posts get popular people will start to recognise that brand. 

7. The ins and outs of linking to FB and Twitter;
I have to raise my hand and say I learned this info the hard way. In my settings I linked my account to my Facebook timeline, thinking it would show on my page; not knowing that it would update all my friends about each pin (can I add that I'm addicted so that's a lot of pins). When pinning something it gives you the optiont o share on Facebook and Twitter, you can do this sporadically so you don't spam all your friends. At the start I was frustrated that I couldn't share my business page, but I figured out how to do it. After you pin something a box appears asking if you want to share your pin, click the Facebook one, then go to your page in the drop down menu. 


8. Write good descriptions;
Writing a good description makes it easier for people to search for this item. Even though it's tempting to write 'amazeballs' as the descriptions, ''chocolate sponge with caramel glaze,they are totally amazeballs cookery# baking# cake# chocolate#' will mean that more people will find it. I must admit that when I'm repinning I don't always edit them to make them better for searching, but it's worth the effort. You can also use the @ and # symbols like you do on Twitter.


9. New profiles;
Pinterest just changed their profile layout recently, and you can now choose what image represents your board. Just click the main image and choose your cover image from your pins. Pinterest users are very visual so try to curate your profile like you would an Etsy treasury, I thought about what images and colours matched each other. Also make sure to add all of your relevant links to your profile, I've stated following lots of new blogs and Facebook pages because I've been interested in their taste of Pinterest. I also added my business name in brackets after my own name just in case people don't know me as Ruth.

10. Find out who is pinning you:
I pin quite a few of my blog posts, but other people pin them too, and it's nice too see what is popular. Just type in www.pinterest.com/source/yourwebsitehere/ and you will see all the pins that link to your site.

11. Be Seasonal;
Every time a new holiday/season rolls around Pinterest is flooded with pins for that event, so at Christmas and Valentines there are endless recipes, present ideas, craft tutorials and shopping guides. If you are trying to promote your own seasonal wares or articles make sure to post them early so that they have time to circulate. Or if you like writing craft how-to's then think about the seasons ahead of time and write up some tutorials geared towards these holidays.

12. Share your profile;
Add links to your Pinterest on your blog and business page. Promote it just as much as the other sites that you are part of, if someone finds you on one platform they will want to know where else you are. Make it easy for people to follow you. I even mention that I'm addicted to Pinterest in my twitter profile. You can also add a link to your account to your email signature. Recently I started using social networking icons on my business cards and labels, and on my latest batch I added the P to represent Pinterest.

13. Add the Pin It button to your posts
Sometimes you will see a little red Pin It button on blog posts, this is just like a facebook or twitter sharing button. You can go here to get your button and just paste the html into you post template so that it appears in each of your blog posts like a signature. You can find this in Settings, and then go to blog posts, and paste in the html.

14. Pinterest is a community
You are able to like and comment on pins just like on Facebook. To take part in the community more comment on other peoples pins to interact with them. You can also use the ' symbol to tag another user if you see something that you think they might like, or to let them know you are talking about them. I must admit that I'm guilty of not doing this, but I'm very excited when i do get a comment because it happens so rarely!

15. Set a timer/limit;
Be warned Pinterest is incredibly addictive, and time can easily fritter away. Because of the nature of the site it always leads you to more sites, with more cool stuff, with other links, and so on. They estimate that the average regular user spends 1 hr 17 minutes on it per day. To stop yourself whiling away the hours looking a pretty things set a deadline for yourself, trust me I've learned the hard way.

Helpful Links:
Pinterest deconstructed infographic
Guide to Pinterest infographic
Marketing tips for Pinterest
How to find the original source on Pinterest
7 Ways to use Pinterest
and saving the best til last...
The ultimate guide to Pinterest

Monday, 16 April 2012

Blogging Pt III: 12 Steps to More Traffic on Your Blog


This is the third and final part of the blogging series by Ruth from Nice Day Designs, these pieces were originally posted on her website and were republished here with permission. This installment is about increasing your traffic, make sure to follow the links to read part 1, blogging basics, and part 2, blog design.

I don't claim to be an expert in getting traffic to my site, to be honest it's probably the thing I'm weakest at. But I've made lots of mistakes along the way which means I've learned loads too. Here are some tips that I picked up:

1. Use Your Tags:
When writing a post make sure to use your tags, it will help people who are searching on Google. On blogger there isn't a categories option but I used tags as a way of making easily defined topics, each of my posts uses one of my 12 set tags. Try to think about your article and how a reader might describe it if they were trying to find it.

2. Share on Facebook and Twitter:
Make sure you share all of your new blog posts on your social networking sites. My facebook business page has been a massive help to my business and my website, it is a large source of my daily traffic. Some people prefer to comment on fb or Twitter on your posts rather than comment on your site, make sure to engage in these comments. I also like to share specific links with other users if their conversation is relevant to one of my older posts. For example if people are talking about good films they have watched recently I might comment with a link to a review I wrote. Be careful not to do this too much or in a spammy way, only post it if you genuinely think people will be interested.

3. Join Pinterest:
Pinterest is an amazing site where people 'pin' or bookmark images from sites, and create virtual mood boards that are catagorised by topic. It has been great for bringing new traffic to my site, from other members pinning my posts. I also pin some of my own posts too, like this series on blogging and other crafty how-to's. I will be doing an in depth post on the ins and outs of Pinterest in the next two weeks for those of you unfamiliar with the site.

4. Ditch Your Networked Blogs Feed:
I used to use Networked blogs as an automatic feed for my Facebook page, and I thought it was great as I didn't have to manually post the link. But I noticed that Facebook has started to group topics in the news feed, so all posts from Networked Blogs would come up as one single update. This means that if 10 people that I follow were using this tool had new blog posts in the same day I would just see one update in my news feed, something that could be easily missed. To avoid this just uninstall the tool, and go back to manually linking from your Facebook.

5. Guest Post on Other Blogs:
A great way of reaching a new audience is to do guest posts on other blogs. Lots of people that have never heard of you before will be able to see your site. I really enjoy writing for Etsy Ireland, and last year I was thrilled to guest on my favourite blog Lupin.


6. Add an RSS Option:
To be honest I've never used RSS, and didn't know what it was until recently, so I didn't pay any attention to it. But other people use it to follow blogs and find out about new updates, so you need to add the option to your site. Blogger have a gadget which you can add to the sidebar. I noticed that Wordpress sites have welcome box that can be added to each post with invites people to follow via RSS. I tried to get a posh one online but it wouldn't work, so I just added a basic text one. A simple bit of text can be added to the body of each of your posts by going to Settings-Posts and Comments- Post Template, in there just enter your html for your RSS welcome message.

(Note: I created my html by going to New Post, typing in 'Did you find this post helpful or interesting? To follow my other posts here is my RSS feed'. I changed the background colour to blue, and changed the text colour to white to make it stand out. I then highlighted RSS and added the link to my RSS feed. I then switched to html view and copied this text over to the Post Template. Here is the code you will need for the atom feed, just make sure to replace your own address in the text)
 http://blogname.blogspot.com/feeds/posts/default
(Also note that RSS feeds do not work for Google Chrome)


7. Do Featured Posts:
I regularly do posts based on a theme usually around something that is trendy at the moment, like beards, alternative weddings, or tattoos. I usually feature lots of images from Etsy shops or crafty how-to's. I make sure to link to these shops, and then I let them know via a convo to their Etsy shop. I normally say that there is no need to reply but a comment on the blog or sharing on the fb or Twiiter would be greatly appreciated. I prefer to do these posts than make treasuries on Etsy, as I think they get seen by more people. They also help traffic to the site as people will find them in Google searches, I still get lots of traffic from my post about weddings.

8. Host a Giveaway:
I haven't done a giveaway in ages but it really helped me at the start to get some followers. Make it a condition of entry to become a follower, and give bonus entries for sharing on Facebook or Twitter. If your prize is from your Etsy shop make sure to post it on Etsy Giveaways to let people know about it. Or alternatively you could host another persons goods as a guest giveaway, Ruby Clover did this with great success, and even hosted one of my own giveaways many moons ago.

9. Add Your URL to Your Email:
It's such a simple thing but lots of people forget to do it. Create an email signature with links to your site and your shops. Also when ever you send a convo  on Etsy make sure to have a link to your website, fb and Twitter, it's annoying that you have to type it out each time, but it's worth the effort. Here is a great article on creating an email signature.

10. Business Cards:
If you are blogging for your business make sure you have a card, or even if it's a personal site it might be fun to have cards too. I hate when I meet bloggers in real life and we have a great nerd chat about blogs and neither of us have cards on us. Even though I have my flyer that I use for work with all my details on it, I still get Moo cards printed just so I can always have my business cards handy in my key ring. I also enclose my flyer in every online sale, and in the bag with every real life sale, you never know who will hang on to that info or pass it on to someone else.

11. Add Share Buttons:
Make sure to have share buttons on your posts, both Wordpress and Blogger have options for this, so there is no excuse not to have them. You want to make sharing your posts as easy as possible for readers.  To add the tool on blogger go to Template, and click the middle box that says Blog Posts, and you will see the option there. I also added a Pin It button to all of my posts since I became a Pinterest addict. This is a little bit of code I grabbed from the site and added below my RSS signature, so that it comes up in each post.

12. Use Images:
I talked about using images before and how important they are in breaking up the space and making your blog look prettier. But images are also great for searches too, a lot of people do Google searches through images instead of text. Getty Images is a good source of free images if you don't have your own graphic or photo. Always make sure to link back if you are using somebody else's image.

I hope this series has helped you all, I mostly did it for fun, and I must say I learned loads while researching it. If you have any more tips please leave them in the comments section, I certainly don't claim to know it all, and I'm always hungry for more information, so please share!

Helpful Links:
21 tips to increase blog traffic
25 tips for blogging
Creating an email signature
Hosting a blog giveaway

Pin It

Monday, 19 March 2012

Blogging Part One: 20 Basic Tips

This post was originally posted by Ruth Crean on her blog Nice Day Designs, and was republished here to help all the members with their blogs.

This will be a 3 part series dealing with basics of blogging, design, and promotion. Today I'll be doing the basics, I wrote an article last year on this for Etsy Ireland  ,some of the info is out of date because of the changes made this year to blogger, but there are still some helpful tips for total beginners. The following post will be published weekly each Monday, so stay tuned!

Firstly you have to decide if blogging for you, lots of crafts people feel that they have to have one because everyone else does, or that it's hurting their business not to have a blog. Now that we have things like Facebook and Twitter there is really no need to start blogging if it would feel like a chore. It's just as easy to share your new creations on FB/Twitter, and there is not as much pressure to write. So if you like writing, would enjoy getting involved in the community of bloggers, and don't mind putting in lots of work for free then you have found your calling as a blogger. I've been blogging for nearly 5 years now, and I started it because I missed writing. In my day to day life there is no reason for me to write, and between the years of finishing college and starting Nice Day Designs the only things I composed were emails. I don't claim to be a great writer, but it's a hobby that makes me happy, so starting my own blog seemed like a perfect forum for my ramblings.

So now you need to choose who to go with. Most web designers and bloggers will say Wordpress , as it has more potential down the line to make it feel more like a website rather than a blog. I went through a phase of being very frustrated with Blogger, but I've stuck with it over the years. With all the developments they have made in the past 6 months it's an incredibly easy to use site, and might be preferable to beginners. I've tried Wordpress and I wasn't really a fan. but that's probably because I'm so used to Blogger. There is a handy table here to show you the comparison between the two to help you decide. Most established blogs seem to switch over at some point to Wordpress, and to be honest I'm still toying with the idea, but it can be expensive to hire someone to do it. I just found this ebook that came highly recommended to help guide you through the switch over process if it looks like your blog turns from a hobby to a more committed thing.


Tips:
1. Think about your content, but don't stress over it. When starting your blog think about what you are trying to say overall and who your readers might be. This will help you come up with new posts when you are having an off day. Example this is a craft blog and I wanted to keep my own personal voice. Which means I have a mostly female readership, which in turn will be interested in things like fashion and handsome men! Hence the addition of things like my 'What I'm Wearing' series and 'Hotty but Notty'. Content is key, you will not keep readers if they feel you are writing it as a chore to help promote your business. I've seen an endless raft of blogs like this and I never go back to them.

2. Post regularly and consistently. If you are a once a week blogger then choose a particular day. Don't have 10 posts in 5 days and then nothing for a month.

3. Choosing themed days might help you with get over any writers block. We used this to great effect on the Etsy Ireland Team blog, there was how-to tuesday, and fab 5 friday. You don't need to catagorise your whole week but it's handy to have an old reliable, and it's also nice for readers too as they know what to expect. I'm a particular fan of mags Pretty Boy/Girl Friday.

4. Link as much as you can when you are talking about something. People who read blogs want information. If you are writing about crafts link to your shop, where you got your supplies, and what craft books you are reading. This is done by highlighting the word in question and clicking the link option.

4. When linking always have the option 'open this link in a new window', that means that you are not sending your reader away from your site. It's very easy for a reader to get distracted in that new site and not go back to yours, whereas if they still have your site open in a window they will most likely go back to it.

5. Refer back to old articles on your blog when you are writing, like above I mentioned yesterday's post and also the article I wrote for Etsy Ireland. This will get people interested in your back catalogue.

6. Another handy tool for this is Link Within, that's the little pictures you see at the end of each blog post show you older and related posts. As a blog reader find these really helpful and have often spent a half hour on someone's site reading their older posts. It's really easy to install with their step by step guide.

7. Please turn off the Captcha if you are on blogger! Loads of people hate them and it puts them off commenting. If you are concerned about security then moderate your comments, or what I do is moderate on comments older than 14 days. I have had spam bots post tonnes of comments, but after I made the older posts moderation I haven't had any trouble.

8. Scheduling your posts is a great way to get posts written for the week when you have spare time. Monday is usually my blogging day and i space them out over the week.

9.Interact with other blogs, when you read an interesting article, don't be silent, leave a comment. The blogger will appreciate it and other readers will click your link and go to your blog. Try to do this a much as possible.

10. Respond to comments left on your blog. I don't respond to every single one, but when a few have build up I leave one comment responding to a few people at once. If you notice a new commenter visit their site and leave a comment on their blog about something they have written, it's only polite.


11.Give credit. If you are not using your own photos, or if you found a great crafting tutorial make sure to link to the original site, otherwise you are stealing the image/how-to. Most bloggers don't mind if you link to their work without asking permission first as it will drive traffic to their site. Again it's about being polite.

12. Please don't have music on your blog, or if you really want it let it be optional. A lot of people read blogs in the office(when they meant to be working) so the last thing they want is an announcement to other satff that they are skiving off. Even though I work from home I find it annoying and distracting, most of the time I click out of the site.

13. Share your skills. Lots of my favourite blogs are informative by either doing craft how-to's, marketing tips or cookery suggestions. If you have a hidden skill people want to know about it. Do you have an amazing recipe for chili, or a genius list of uses for vinegar? Let the world know about it by writing a how-to/guide.Be careful not to spill all your business secrets though, if you teach people how to make all the products that you sell they might not buy from you. Lupin Handsmade balances this line very well.

14. Don't obsess over you visitors numbers, it can take a long time to get established. It's only in the past year that I'm getting a decent amount of hits per day, and even at that they are fairly small compared to other craft site. Remember to be patient, but also remember to enjoy it and not stress over the figures. In later articles I'll give tips on driving traffic9although I'm no expert!)

15. Use lots of photos, number one they serve to break up the text, at heart we are all children who love picture books. I like to upload my pictures as extra large and centred, this avoids tricky formatting trying to integrate them into the text.

16. Link your images where possible, most blog readers expect this(I know I do). For example when I doing an etsy finds post I link the image to the item(by highlighting the photo and clicking link) I also type in a description and price underneath, and I also link this. I tried using the add caption option and linking this but that means that when you click the image you get an error notice. I prefer to put in the extra effort and link both separately.

17. I prefer having a long list of posts rather than having to click older posts repeatedly. It's totally your preference, but I get get bored if the whole rage has to reload every time I want to read an older article. I limit mine to 15 posts.

18. Intersperse weightier more time consuming posts, like this one, with lighter quick posts like my beardy post last week. Otherwise you will be a slave to your computer and not have a life.

19. Mix things up, don't just blog about one thing. If i just blogged about the crafts that I make I would bore myself and my readers to tears. I have other interests so I share them here, it gives a more personal and fuller perspective about who i am. You never know what will appeal to readers, my most popular post of all time is how hot Dave Grohl is.

20. Don't over share. I'm all for letting people in and showing my vulnerable side, but I still treat this site as a face for my business. I don't talk about my sex life, or bitch about people I have issue with. Your blog, especially  business blog, is about putting your best foot forward.

Most importantly have fun!

Stay tuned next week for part two on the importance of design.

Useful Links:
Blogging Your Passion 
Get a more professional looking blog.
The Backlight-loads of blogging tips
Blogging Myths
50 tips to battle writers block
The Art of the Article

Pin It

Monday, 12 March 2012

How-To:Tackling Facebook Timeline

This post was originally posted by Ruth on her Blog Nice Day Designs, and was republished here to help all the team members get to grips with the few format for Facebook business pages.

Those of you who run business pages on facebook will have noticed that they are phasing in Timeline for pages. You have till the end of the month until it's mandatory, so that gives you a bit of time to figure it out and play with your page design before it goes live. At this stage I'm a bit of a business page expert, for anyone looking for tips on setting up a page I wrote this article last year on 'Facebook Pages:An Idiot Guide'. Whereas today's article is a bit more advanced for those with established pages who know the basic ins and outs already.

Firstly I cannot overestimate the amount that Facebook has helped my business, it may be time consuming but at the end of the day it's free, and it's a form of advertising that customers actively opt into and pay attention to, you just can't buy that kind of press. I've had my page for about 2 years and it has brought me lots of new customers, real and online sales, and helped me build a personal relationship with the people who buy from me. They get to put a face to my business and I get invaluable feedback, it's a win win situation.

In the past few months facebook have been making lots of little changes that at first seemed very limiting to pages, but now that they have unveiled Timeline most of it gels together very well. The most obvious difference with Timeline is the appearance, it's a much wider 'wall' with two columns instead of one. Older stories are now accessible by date from the panel on the right hand side, giving the lifespan of the page. They have added a new tool which means that you can bump up old posts by 'Pinning' them, this is done by clicking the pencil icon on the right of any post and choosing the option 'pin to top'. This brings this post to the top of your timeline on the left hand column. It's a good idea to regularly pin popular posts that reflect your page so that prospective 'likers' can gauge quickly what your page is about. Once an item is pinned it remains at the top for 7 days.

Another way to make a post more noticeable is to 'Star' it(do this by clicking the star icon on the right of any post) this makes the item double width, and much more noticeable when scrolling through older posts. It's good to punctuate the timeline with a few of the favourited posts to break up the double column layout.


When I first went onto timeline I was disgusted that landing pages were made defunct as there is no longer control over what tab a new viewer arrives on. Previously I had designed a landing page that reflected my business and brought me lots of new 'likes'. Facebook have replaced this with a cover photo, a large image that sits behind your profile picture. It is fine to use an image of one of your products in this window but to get the best results it would be better to have a text and image graphic(similar in a way to the banners on Etsy). Although be careful facebook have some rules about what text can go here, you are not allowed to point towards the like button, include sales promotions or other info that should be in the about section. The dimensions for the cover photo are 851 px wide and 315 px tall, and make your document 72 dpi.

They have also added 'Milestones' to the timeline, which act like starred posts(double width), but are designed to highlight key events in your business like awards, press etc. Your chosen event date will then be marked in your timeline. You can create these in your status bar, next to ask a question, and you can upload a photo with your description, the picture dimensions are 843 px wide and 403 px tall. This new feature can be used to great effect to give the history of a business in a dynamic way, especially for older businesses as they can mark events and trivia through the past decades. There is a lovely example here at Leo Burnett Worldwide.

Facebook have added a handy admin panel at the top so all traffic and notifications are easily available. Thank goodness the days of no notifications on business pages are over, that was a nightmare! You can monitor traffic, reach, and who is talking about your page. They have also added a private message section which is really handy rather than people having to discuss sales on your wall. During my research for this article I found out that pages can directly message their 'likers', although be careful not to abuse this and alienate your readers by spamming them. But you can only message people who have already sent a direct message to your business page, you can not start a new conversation with one of your fans. It would be a good idea to post an update letting your fans know that they can now send you a direct message, as most people don't know the mechanics behind a business page.

You should also note that the amount that your updates appear in peoples news feed has changed over the past few months, someone who interacts with your page is more likely to see your updates that people who don't. This means that you need to post more regularly, and at different points in the day. It is also advised that you post different types of things, not just talking about your business all the time. Use pictures, ask advice, questions, share finds from Pinterest etc (For more info on this large topic head over to this great article).

The magazine format of timeline has meant that facebook is becoming a much more visually based forum, so as crafters we should utilize this. Post pictures from your mobile while you are making something. While shopping for wool/materials snap a picture and ask what colour people prefer. Share helpful craft articles that you are reading online. There are lots of ways to vary your updates, just start thinking outside the box.  You'll soon start to notice your 'talking about' numbers increasing, and afterwards your likers. Try to post information that people will want to share, George Takai (Ensign Sulu from Star Trek) has a great business page where he posts loads of funny geek pictures, he gets hundreds of 'shares'  every day because his content is great.

All in all I'm pretty happy with Timeline now that I've learned all the new features. At first I hated it because it meant that I had to relearn lots of things. One frustrating thing is that they don't have an attach link function anymore in status updates which leaves an ugly pasted link at the end of the update, it seems like a pointless change. But the overall benefits outweigh any clunky problems. Knowing facebook they will come up with a whole host of new changes in another 6 months just to annoy everyone!

Helpful Articles:
Involver
The Drum: 5 ways timeline will impact business pages
CMVLive: Timeline, what's it all about?
How to get more interaction on your business page

My business page

Pin It

Tuesday, 8 February 2011

How to Take a Screenshot

Hello, Anne-Marie of ByAmor here with the basic, standard guide to taking a screenshot in Windows, in response to a request from Fi of Patchwork Delights.
Depending on what computer package you've got, you may have quicker options for 'snipping' or capturing images from your screen. This tutorial shows the good old fashioned way of doing it if you don't have, or like me, can't seem to find :-], one of those nifty tools.

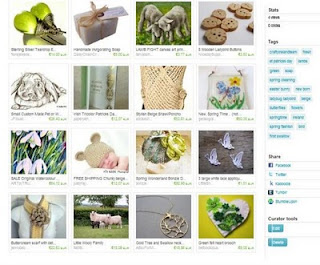
Let's suppose, for example, that you have been featured in, or curated, a treasury and you wish to post it on your blog. I'm going to use a treasury I made recently, 'Chocs & Flowers for Valentines Day' as an example.

'Image on-screen'

Forgive me please if I state the obvious, but you're going to capture exactly what you see on your screen. So before you do anything, you may need to zoom out ('Cntrl' and the minus sign - ) to fit in the whole image and or, hit F11 on the top of your keyboard to get the image on full screen.What you see on your screen is what you will get!


The 'Print Screen' button can be found on the top right of your keyboard. it may be labelled 'PrtScn'. You hit it, but nothing seems to happen, right? Actually, the entire image on your screen has been saved to a clip board. You just need to paste it into a graphics programme to see it.


After you hit the 'Print Screen' button open up a basic image editting programme such as Microsoft Paint.


Here, go to 'Edit' and click on 'Paste'. Voila! There's the screenshot.

Go to 'File' and choose 'Save As' (not 'Save). Save the image to a folder in 'Pictures'. For some images it's best to save as a Gif, but I have found with treasuries featuring lots of colour the image can come out a little strange, so I stick to Jpegs. Close out of Paint.

'Cropped and auto-adjusted'

Now you can open the image in your Pictures folder using your preferred photo editting package. Crop and edit the same as you would a photograph.

With treasuries, there's not much to be done so I use the basic, ready-installed Microsoft Office Picture Manager to crop, and perhaps adjust the lighting to make the images stand out. With most treasuries, auto-adjust will do the job nicely in terms of colour and light. I find with treasuries, there is no need to resize once I've cropped out the bits I don't need. Certainly, don't go below 500 in width.

Once saved, the image is now ready to upload to your blog just like a photo.


*To learn how to make treasuries, check out this tutorial.

*To express a request for team blog tutorials and articles, please use this blog wish list thread . Any Crafty Ireland team member is welcome to write for the blog, so please contact our Blog Editor, Brigitte of Purls of Colour if you'd like to contribute.

Tuesday, 25 January 2011

Step by Step to Making Etsy Treasuries.

A request was made to post an easy tutorial on making Etsy treasuries. Anne-Marie here, hoping to make it eeeezy peeeezy without over-simplifying...here goes...

Treasuries are lists of items from various Etsy shops curated by Etsy members to showcase and promote each other. They are fun to make, and most of us find them addictive!


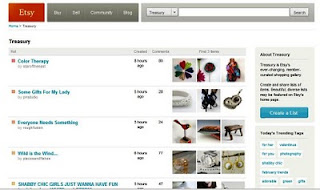
You'll find treasuries when you click on 'Buy' on the Etsy site. Click 'Explore Treasury' to bring up the page shown in this screen shot above. To start your own collection hit the big blue button on the right 'Create a List.'
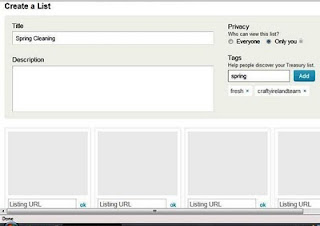
This brings you to the window above. The first thing I always do is set the Privacy to 'Only you' while I'm working away but it's important to remember to set it to 'Everyone' when you are finished. Those who are more experienced and super fast at making treasuries probably don't bother to temporarily hide their list as they can get it done in one short sitting. I however, am slow and do it in stages rather than in one go, so I hide it until it is ready to share.

Give your list a short, title and if you wish, a brief description. You can edit this later if you find the theme evolves a little as you get into it.

Over on the right of the screen you can use up to 18 tags to describe your treasury, much like you tag the listings in your shop. Be sure to use the tag 'craftyirelandteam' for team treasuries so Ruth of Nice Day Designs can find them for the treasury report.

Next, open a new tab or a second browser and log into Etsy so you can find and copy the listings you wish to feature.

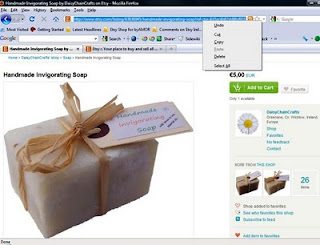
Search for items to include. If you are making a team treasury use the search term 'Craftyirelandteam', perhaps adding a second term to suit a chosen theme or colour. I've clicked into a listing from Daisy Chain Crafts in this example. Go up to the top of the screen where the URL for the listing can be found (highlighted blue in the screenshot above.) Right click on the URL to highlight it and click 'copy'.
Go back to the original tab/browser where your treasury is and paste the URL into one of the boxes labeled 'Listing URL.' Then click 'ok' beside it and the item will be inserted into your treasury.
Keep going back and forth between the two tabs/browsers, filling up your treasury with suitable items. You have up to 16 slots to use. You can move items about by dragging the image from box to box until you are happy with the layout.

A handy little tip is to save the list from time to time so you don't accidentally lose your work going back and forth, and then just hit the edit button on the bottom right to continue. If you do that, best not to worry about the layout until you have filled up all the slots.

It is not advised to include your own items or to use more than one item per shop, especially if you hope for your treasury to reach the front page.

Etsy advises us to 'make it beautiful' and how you do that is as individual as you are :-). If you are not sure how to approach the design, browsing the existing treasuries may inspire you. Some treasuries are based soley on colour and/or theme. Some tell a story. Some have a pattern, others don't. There is no set formula. Afterall, making a treasury is an art in itself.
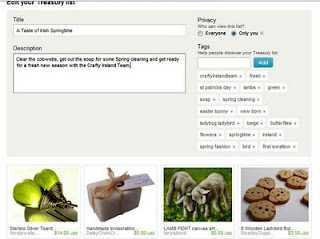
When you are done, check you are happy with your title and tags, hit save and remember to change the privacy back to 'everyone' so you can share the treasury.

Many treasury curators contact the shops they have featured to let them know. It's not obligatory but it is nice and of course, it means your treasury will be seen by more people, and hopefully shared via their twitter and facebook accounts or blogs.

Here is my Springtime treasury if you would like a closer look at all the gorgeous items and shops featured.

The Crafty Ireland Team have a thread going where you can post team treasuries.


Tuesday, 7 December 2010

How-to Register with the Crafts Council of Ireland


The Crafts Council of Ireland (CCoI) is the support agency for the craft sector in Ireland – they are funded by the government via Enterprise Ireland and run on a not for profit basis. Their main role is to act as a champion for Irish crafts.


Why register with CCoI?

If you are registered with CCoI you:

- Can get up to date information on all that’s happening in the sector – via e-mail, e-zines, Stopress (newsletter) and the web site.

- Can get your own page on the CCoI web site

- Can get access to reduced rate insurance

- Can apply for CCoI initiatives – which include: fairs, events, exhibitions, seminars, mentoring programmes, bursaries, research missions and much more

- Can form a network with other makers and apply for funding support

- Can apply to become a member organisation (cost €100 pa) with full voting rights

- Can benefit from PR and promotional activity that CCoI undertake to promote the craft sector i.e. www.give irishcraft.ie

- Can take part in networking events and meet other makers and influencers

And best of all registration is free!


Who Can Register?

CCoI recognise a broad range of craft disciplines including:

- Basketry
- Bookbinding
- Bookmaking
- Candlemaking
- Ceramics
- Tilemaking
- Mosaic
- Fly Tying
- Fresco Painting
- Furniture Making
- Glass Making
- Horology
- Jewellery Making
- Leather Working
- Lettering
- Metal Working
- Mixed Media Constructing
- Musical Instrument Making
- Paper Working
- Papermaking
- Printmaking
- Silversmithing/Holloware
- Soapmaking
- Spinning
- Stone Working
- Textile Making
- Thatching
- Toymaking
- Woodworking

See the www.ccoi.ie for a full list.

To register you simply need to be a craftsperson working in one or more of these disciplines who designs and creates their own work (see the registration form for more detail).

Getting Started

Registration Forms are available from Mary Whelan in CCoI – 056 7796131 / maryw@ccoi.ie or you can download them from www.ccoi.ie. At the moment there is no option to register on-line (its in the pipeline) but you can scan your form and return it by e-mail if you prefer. Mary will be happy to talk you through any queries you have on the forms.

The current registration form is very detailed – but the more information you give the more services can be tailored to you.

If you are a start up business you may not be in a position to fill in all of the business section – don’t worry, just fill out as much as you can.

The information you provide enables the CCOI to tailor a suite of services to your needs and your business type – whether you are a full time craftsperson supplying the consumer market, or a part time maker focused on the gallery / collector end or indeed anything in between…

Confidentiality

All information provided to the Crafts Council of Ireland is held in the strictest confidence. They do not pass your information to any other third party – or any other state agency.

Upcoming Events:

2011 has been designated the Year of Craft and the Crafts Council of Ireland is developing and co-ordinating a range of events and activities to celebrate this.

The World Craft Council will hold their annual conference in Dublin – this will be a 3 day event and elements of it will be open to all CCoI registered craftspeople and member organistations.

So make sure you are registered with the CCOI to find out all that is going on and to join in the activity – or indeed to have your own activities included in the celebrations.

For more information on any of the above contact Nicola Doran, at nicola@ccoi.ie or 056 7796153.

Tuesday, 21 September 2010

How to make a recycled Gift Bow

I hate to throw anything out, ANYTHING, but this is something that a lot of people won't throw out. What am I talking about? Gift Bags, you know the ones with ropey handles that have been reused one too many times & have a few too many creases, but still, I can't throw them out. Then they start to build up & I know that eventually I'll make something with them, right? Well no, not until I have to!


So bring on a weekend when I'm not feeling the best & I have a present for a children's birthday party but no Gift wrap. Finally I decide to use one of my old gift bags and try to make a bow or something that resembles a bow to dress up the present a little bit.

Here's the step by step:


1. Tear off the handles, sides & base of the gift bag (Try not to keep them, throw them in the recycle, ah go on). You can use one side to make one bow. Cut the bag into five equal strips of approx. 13 x 1.25 inches. I used a fancy punch (you can just make out what the image was on the gift bag in picture 1.) but I'm sure it will work just as well with straight solid strips.


2. Take the first strip in your hand, curl it & stick edge at the half-way mark.

3. Turn the whole thing around & repeat step 2.


4. You should end up with the loopy 3D figure 8 shown in picture 4. Make four more of these loopy figure 8s.


5. Put double sided sticky tape at the back of each loopy figure 8


6. To make the centre of the bow repeat step 2. but stick the edge at about the quarter-way mark, keep your thumb holding it together.


7. Curl the strip around your thumb.


8. Loop the tail edge & stick it in the middle. That's your centre done.


9. Turn two figure 8's upside down facing opposite directions and stick together.


10. Stick the next loopy 8 on top right side up facing a different direction from the last two.


11. Stick the last loopy 8 on top right side up again facing a different direction from the last three.


12. Stick the bow centre in the middle in between all the loops.


If you want to see the step by step in larger pictures you can find them on my facebook page in the album How to make a recycled Gift Bow

Tuesday, 14 September 2010

Caring For Your Jewellery

Hi Anne-Marie of Handmade by Amo’r here again with some general, basic tips for cleaning and caring for various types of jewellery. I sense a disclaimer coming along now....please note I am not in a position to advise on how to care for specific items of jewellery not bought from me. The best thing to do there is to contact the supplier.

There are a couple of simple basic care tips that apply to all jewellery.

First the obvious ones, which we can sometimes overlook. You should always apply your make up, hairspray and perfume before you put on your bling. The same goes for any other lotions and potions, which should be allowed to soak into the skin first.

Also, wearing your jewellery in the swimming pool is ill-advised. Chlorine erodes metals, while stones can get dislodged from their settings.

Heat can affect many stones so store your jewellery in a cool place.

Some gemstones fade if left for long in sunlight, particularly amethyst, turquoise and sometimes, stones that have been colour enhanced.

Jewellery trees might be a pretty way to display your beaded lovelies, but hanging strings of pearls and heavy stones or beads can cause the stringing material to stretch.

Sterling silver and un-lacquered copper are best stored away when not in use. Tarnish is oxidation. Special, tarnish free, airtight baggies or boxes, can help keep metals brighter for longer. You can buy anti tarnish paper strips and cut them up to insert into an ordinary baggie. Bagging your jewellery also prevents gemstones from scratching off each other and keeps pieces from getting tangled in the jewellery box. Pearls should not be stored in plastic as they need to breathe.

On a greener note, and better yet, you can buy anti-tarnish cloths from a good jeweller’s and wrap the pieces in them. They are a bit more expensive but are more eco-friendly.

A lemon and salt solution will brighten up un-lacquered copper pieces.

Read this post for a bread soda recipe (aka baking soda) that will clean sterling silver chains and sterling silver jewellery not containing stones, pearls or other natural materials. It is fine for pieces containing glass or plastic beads though.

Gold should be stored flat in boxes lined with satin or velvet. It is a relatively soft metal. Storing in baggies or cloth pouches may result in the components rubbing off each other and wearing away. Occasionally wash gold jewellery with gentle soap flakes dissolved in luke warm water.

Pearl or amber jewellery that has gotten very dirty can be washed in mild, soapy water too. However, I would avoid soaking strung jewellery as it may affect the stringing material adversely. Such organic gems should never be cleaned with abrasive materials. If they are not too dirty, it is best to gently wipe them with a damp cloth after wearing, let them dry naturally and then put away.

Ultrasonic cleaning is fine for most diamonds and sapphires, but not for a lot of other stones. Always check with the retailer when buying precious gem jewellery. Certain, opaque, semi precious stones such as Connemara marble, turquoise, sodalite, malachite etc should not be cleaned like this nor should they be subjected to any harsh chemicals.

To clean semi-precious gemstones, gently rub with a damp cloth and pat try with kitchen paper or a soft cloth.

If you can’t remove stone pendants from their chain, take extra care when cleaning the metal. It is best to simply use a polishing cloth regularly on the chain to prevent tarnish but sometimes you do need something more.

I wrap the stone several times in Cling film and put on latex gloves to hold it while carefully dipping only the chain and bail into commercial silver cleanser (eg Goddard’s Dip ). Please do not do this using the bread soda solution as there is a serious risk of scalding.

Another option is to wash the chain in luke-warm, mild, soapy water. After you have rinsed and dried the chain, remove the cling film from the stone and clean it with a damp cloth. Some stones can be washed in the soapy water too, rendering the cling film unnecessary.

Avoid washing or chemical cleaning of items containing alloys such as Tibetan silver or ‘antiqued silver.’ Use a barely damp cloth or dry kitchen paper to wipe them.

Most important of all, show your jewellery some love by wearing it often.

Tuesday, 7 September 2010

How-To Tuesday: Shrinky Dinks


Hi this is Ruth from Nice Day Designs, it been a while since I posted anything here on the team blog, *waves* to all the new readers.


It was about 2 months ago that I first spotted 'Shrinky Dinks' in some craft tutorial online. I was totally fascinated by them, and the more research I did they seemed too good to be true. Basically they are a plastic that you draw on, stick them in the oven for a couple of minutes and they get 7 times smaller and 7 times thicker!! They go from a thickness like ascetate to a sturdy clear plastic. There are endless possibilities, from earrings, card embellishments, ornaments etc etc. Apparently they are huge in the US and all American kids play with them, but I had never heard of them before or seen them in any craft shop here.


I tried to order some directly from the website but they were going to charge me $40 shipping on a really small item. Instead I had a look on ebay and found 'Shrinkles', a 'shrinky dink' substitute, the same product but with far more affordable shipping.

I got the transparent and opaque versions, both in packs of 50 for a total of about 20 euro. To get a decent sized image I used an entire sheet per piece. For the transparent shrinkles I had to use 'Sharpie' markets, I was able to get a set of these in my local craft shop Silkes for 10 euro. But for the opaque ones regular colouring pencils are fine.

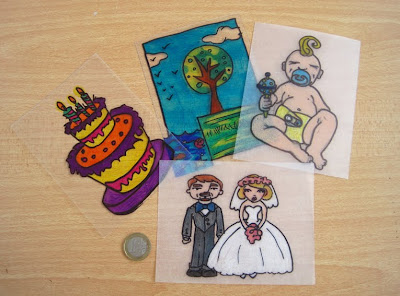
I was delighted with how they turned out, shrinking an image always makes it look way better as the detail is condensed. I included a euro coin in the photos so you can get an idea of the change in scale. Also since they are transparent they would be very easy to trace images if you are not that confident at drawing.

After making lots of them I've decided I prefer the opaque ones as you can get more detail and texture with the colouring pencils. Recently someone saw the cards I made with them and I've been commisioned to do a large scale artwork with them pieces lots of panels together...I'm excited to get started on it soon.

Tuesday, 24 August 2010

How to Clean Silver Jewellery

This week's 'How to Tuesday' comes from Anne-Marie of Handmade by Amo'r.

When sterling silver tarnishes naturally, it can look rather dark and dirty. You can buy commercial dips for cleaning it, but making your own cleanser is a bit more fun and probably cheaper.
The old trick of dipping jewellery into cola or scrubbing with toothpaste gives me the heebie jeebies. While you might get away with it sometimes, these methods are too harsh for most jewellery so it’s not worth risking your treasured baubles and bling.


I find a bread soda solution works perfectly on silver and it is very quick and easy. Do not use it on pearls, gemstones, amber or wood. However, glass or plastic beads will be ok. This should not be done by children as there is a danger of scalding.

So stick on your alchemist’s bib, sorcerer's cape or failing these, a witch’s hat, and let’s get started...

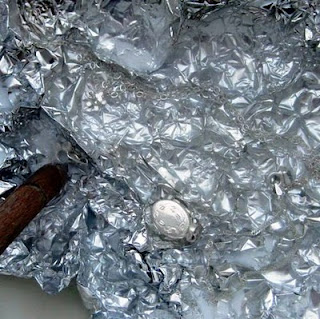
First slap on the kettle to boil while you gather up a non-metallic bowl (e.g. glass or plastic,) a pack of bread soda, a wooden or plastic spoon or similar and some kitchen foil, aka tin foil or aluminium paper. Crumple the foil a little bit and place in the bottom of the bowl, shiny side up.

Spread the jewellery over the foil, ensuring as much contact is made between the foil and the components as you can. Shake enough bread soda on top to cover the pieces.

Here comes the fun bit. Very carefully pour an inch of hot water over the lot and it will bubble up like a witch’s cauldron. Best have the window open as it does smell like wing of bat mixed with rotten egg. The first shot I got of this process in action captured nothing but a cloud of steam. I lost a few precious moments cleaning the lens but if you look closely at this pic, you might catch a glimpse of the bubbles just before they calmed down.

Use a wooden or plastic utensil to flip pieces over and nudge them into the foil.


It only takes a few moments for the jewellery to brighten up. Taking care not to scald yourself, tip the items out into a sieve so as not to lose any and rinse in cool water. Pat dry with a cloth. Tada! All shiny and new. Maintain your silver jewellery in between cleans with a silver polishing cloth, available at any jewellers.

To clean copper, read this article. I’ll be back soon with an overview on caring for various types of jewellery.