Treasuries are lists of items from various Etsy shops curated by Etsy members to showcase and promote each other. They are fun to make, and most of us find them addictive!
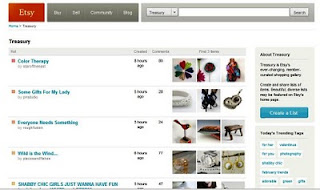
You'll find treasuries when you click on 'Buy' on the Etsy site. Click 'Explore Treasury' to bring up the page shown in this screen shot above. To start your own collection hit the big blue button on the right 'Create a List.'

You'll find treasuries when you click on 'Buy' on the Etsy site. Click 'Explore Treasury' to bring up the page shown in this screen shot above. To start your own collection hit the big blue button on the right 'Create a List.'
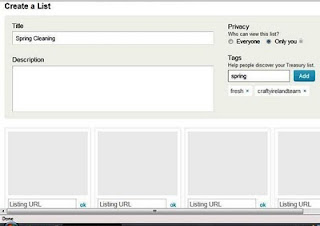 This brings you to the window above. The first thing I always do is set the Privacy to 'Only you' while I'm working away but it's important to remember to set it to 'Everyone' when you are finished. Those who are more experienced and super fast at making treasuries probably don't bother to temporarily hide their list as they can get it done in one short sitting. I however, am slow and do it in stages rather than in one go, so I hide it until it is ready to share.
Give your list a short, title and if you wish, a brief description. You can edit this later if you find the theme evolves a little as you get into it.
Over on the right of the screen you can use up to 18 tags to describe your treasury, much like you tag the listings in your shop. Be sure to use the tag 'craftyirelandteam' for team treasuries so Ruth of Nice Day Designs can find them for the treasury report.
Next, open a new tab or a second browser and log into Etsy so you can find and copy the listings you wish to feature.
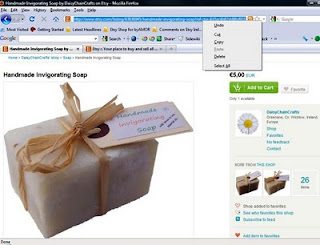 Search for items to include. If you are making a team treasury use the search term 'Craftyirelandteam', perhaps adding a second term to suit a chosen theme or colour. I've clicked into a listing from Daisy Chain Crafts in this example. Go up to the top of the screen where the URL for the listing can be found (highlighted blue in the screenshot above.) Right click on the URL to highlight it and click 'copy'.
Go back to the original tab/browser where your treasury is and paste the URL into one of the boxes labeled 'Listing URL.' Then click 'ok' beside it and the item will be inserted into your treasury.
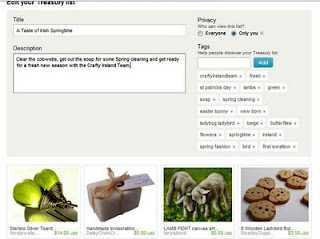 Keep going back and forth between the two tabs/browsers, filling up your treasury with suitable items. You have up to 16 slots to use. You can move items about by dragging the image from box to box until you are happy with the layout.
A handy little tip is to save the list from time to time so you don't accidentally lose your work going back and forth, and then just hit the edit button on the bottom right to continue. If you do that, best not to worry about the layout until you have filled up all the slots.
It is not advised to include your own items or to use more than one item per shop, especially if you hope for your treasury to reach the front page.
Etsy advises us to 'make it beautiful' and how you do that is as individual as you are :-). If you are not sure how to approach the design, browsing the existing treasuries may inspire you. Some treasuries are based soley on colour and/or theme. Some tell a story. Some have a pattern, others don't. There is no set formula. Afterall, making a treasury is an art in itself.
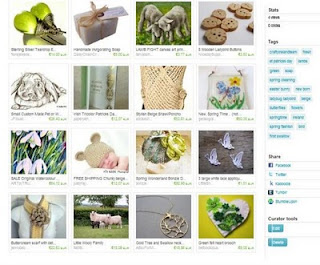 When you are done, check you are happy with your title and tags, hit save and remember to change the privacy back to 'everyone' so you can share the treasury.
Many treasury curators contact the shops they have featured to let them know. It's not obligatory but it is nice and of course, it means your treasury will be seen by more people, and hopefully shared via their twitter and facebook accounts or blogs.
Here is my Springtime treasury if you would like a closer look at all the gorgeous items and shops featured.
The Crafty Ireland Team have a thread going where you can post team treasuries.


Really great, clear instructions! I'll certainly give it a go, thankyou!
ReplyDeleteAM, that's a brilliant tutorial!
ReplyDeleteGreat tutorial Anne-Marie! You're really good at explaining things clearly. Thanks :)
ReplyDeleteThis is great Anne Marie.
ReplyDeleteCan you also do one on "screen shots" too please?
Thanks Fi
Brilliant! - Knew it had to be easy - I'm going to experiment with this in the next little while
ReplyDeleteFi, great idea! I am looking for one on facebook, especially facebook (fan) pages :)
ReplyDeleteYou're welcome :-)
ReplyDeleteFi, sure , no probs. I'll do a short and sweet one soon. I actually forgot how to do it myself when I went to post the tutorial but it's simple, once you know (remember) how!
Me too Purls I'd love it if anyone on the team would like to post a tutorial on setting up your FB fan page...might spur me on to finally set it up myself.
Tomorrow I'll start a discussion thread on the forum where we can all put in requests for tutorials and articles. Between us all (us = any team member who wants to write, not just regular blog hosts) we might be able to cover a lot of requests.
Time for zzzzz now...I'm not sure I'm even thinking in English anymore at this hour.....
I've started said discussion thread:
ReplyDeletehttp://www.etsy.com/teams/5054/crafty-ireland-team/discuss/6760480/