Showing posts with label how to tuesday. Show all posts

Sunday, 21 October 2012

Ideas for Market Stall Display

Hi Anne-Marie of Handmade by Amo'r here with a few ideas for market stall display. There's an air of excitement in the run up to Toejam Etsy Market next Saturday, 27th October. Over 20 members of the Crafty Ireland Team are taking part, either in person, or, like myself, through the kindness of others who have agreed to take their items for them.  For some, it will be their first craft market. I hope these ideas are of use:
 TABLE COVERS:

table detail by Ruth of Nice Day Designs
The first and most basic thing is to get a decent cover for your table. Ruth of Nice Day Designs uses a colourful cloth that is suited to the cheerful feel of her products. I use plain white to contrast with my black packaging and display stands. Some sellers prefer an oil cloth or pvc cloth as they are washable and water proof. Others use a sheet or large swathe of material. Whatever you've got, make sure it fits the table and allows you to hide your bags if required.
led light candle
LIGHTING:
You may need to supplement the lighting provided. There might not be a power source to plug in your own lamp so do ask in advance and consider battery lamps or LED lighting. I've successfully used LED candles to brighten darker corners and make the display more inviting. Tanya of Soapiculture says 'I display my bath fizzies, truffles, bombs etc on a cupcake holder - a wire stand. Then I put little battery lit LED lights all around the stand and customers seem rather drawn to it - as it looks pretty.'

LED lights come in various formats and are fairly easy to find online. Veronique of Handmade by Veronique has also sourced some in Ikea.
 Mo of Huggle Knits found some cute, affordable and easy to use lighting from Penneys.
The pre-lit branches couldn't be more seasonal and will brighten up your stall.
I found this petite battery-run bicycle lamp useful for directing a small beam onto something I want to highlight. At under 2 inches long, it is discreet but powerful. I hide it behind a necklace stand  that is on a higher level and direct it at something lower down.
 3D SPACE: 
Your stall is not just a flat table. You are renting the whole 3D space and there are many ways to use it. Heli of Heli Creations and Heli MG makes the best of a tiny table with a custom-made stand that adds height to her stall. An even simpler idea is to create different levels or steps by placing boxes or books under the cloth.
Helen of Strombolitwo explains how she uses two uprights made by her partner '..they get clamped to the table. at the top they have a hole that allows a decent size piece of dowel through, which means that as long as the dowel is a reasonable length it can accommodate any width of the table. The dowel then is used to hang and tie things to and the overhang functions as a rail for about 6- 8 inches each end.'
You are not necessarily limited to the table provided. I am in awe of this handmade wooden table made and used by Stuart of The Wood n Stuff. We don't all have the skill to do this, but it got me thinking you could use, for example, a (clean) bathroom trolley or unused vegetable rack in front or to the side of your table. Ideal for scarves, baby blankets etc!
YOUR IDENTITY:
You don't have to have a banner or sign but it can help draw attention.
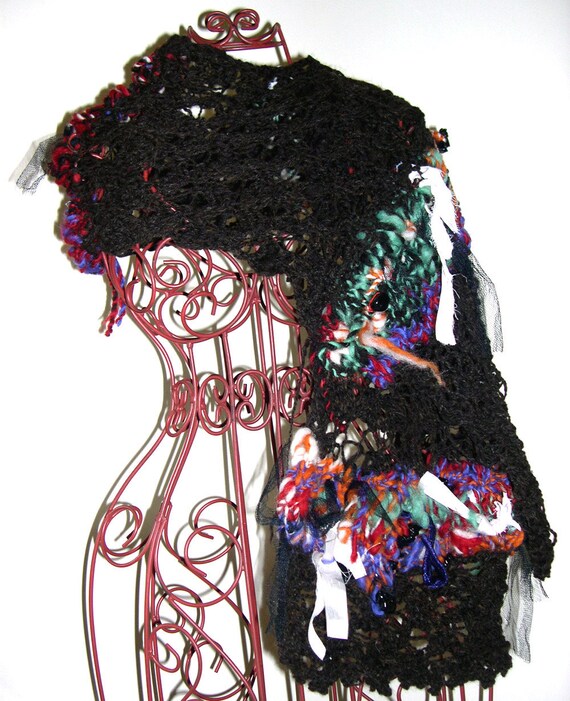
 Unique handknitted art scarf with a Halloween/ gothic/ fantasy motif: Cats, Bats and Witches
I love the fact that Brigitte of Purls of Colour made a banner that reflects the style of her unique, hand knit designs.
 Whatever you do, do not forget to bring loads of business cards! If you have branded packaging, include some of it in the display if it looks right.
DISPLAY AIDS & STANDS:
 You can buy cheaply or up-cycle or disguise all sorts of things as props to display your creations.

Last year, Judith of A Box for My Treasure posted this useful tutorial on How to make Jewellery Stands.

Alas, I was in too much of a last-minute-hurry to take up this great advice and convert and old, concetina photo frame into an earrings stand. 
Instead, I turned it around to the back and slapped on my branded labels to display some seaglass pendants. The black back also happened to match my fore-mentioned black packaging so it worked out just fine.
Irish ornaments by Handmade by Amo'r
I picked up a couple of super-cheap chrome mug trees in a discount store for €2 each. They are perfect for showing off jewellery but also ornaments, charms, indeed, anything small that can be hung up.

 Have a rummage around in discount stores, around the house and in granny's attic. Your display is only limited by your imagination.

I started this piece with market-pro Ruth of Nice Day Designs and I'm going to end with her too as she previously wrote two posts that I found invaluable when preparing for markets:
Market Stalls part 1
Market Stalls part 2

Best of luck to all taking part in Toejam & Esty and other markets around the country this season!


Monday, 23 April 2012

15 Tips for Using Pinterest


I mentioned last week that I would write up a guide to Pinterest, it seems like my Timeline and Blogging articles were popular so I might as well continue imparting my nerdy skills. If you are at all involved with crafts/design you will probably have heard of Pinterest, that is if you are not already a member. It's a website  where people share their taste via virtual pin boards, basically it's like bookmarking with pictures in a shared community. For designers its an amazing resource for two reasons, one it's fantastic for research and information; I've learned tons of new techniques for both crafts and computers since joining. Secondly it's as a way of sharing your own creations, I pin most of my blog posts and some of my etsy listings so my followers (and virally millions of others) can see them.  Even though it has one twentieth the users as Twitter it generates nearly the same referrals, which just shows you the power it has to generate traffic for yourr brand/website. I've been addicted since before Christmas (go here if you would like to follow me) so I've learned a few things along the way:

1. Set up an account;
For some weird reason the site is still invite only, but you can either request one when you go to Pinterest, or if you leave your email in the comments section I can send you an invitation.

2. Don't just repin; 
There are two ways to pin; either by repinning an item that someone else has pinned or by pinning something new to the site. After you've been on the site a while you will see lots of the same tutorials floating around, the community depends on people adding fresh items or it's gets stale very fast. Some of the hardcore Pinners say that you should contribute 1 new pin for every 5 that you repin. But I'm gonna be realistic and say that I do 1 for every 10, I see way too many cool things not to. You can install the pin button on your tool bar that makes pinning cool stuff from the internet really easy.  

3. Pin with the correct link; 
After a while you will notice that not everyone knows how to use Pinterest properly and that some images don't link to the proper site, as a user this is insanely headwrecking!! Please don't be one of those users. for instance if you are on a blog and you see a great post, don't just pin the whole site and click the picture you like, you have to click into the link of that individual blog post and then click your 'pin it' button. Otherwise other people will be brought to the main site rather than that specific post. I hate it when I see a pin for a fantastic tutorial and then I can't find the page. Another thing that people do is pin images directly from Googe images, giving that as a referral link rather than the website, leading people to a dead end, which is also really annoying and breaks the rules of Pinterest.

4. Find a lost pin;
If you get stuck in the above situation but you really want to find the source there is a way. Right click on the pin, then 'open the image in new tab', right click on that and 'save as'. Open up Google Images an drop the file into the search bar, it will then give you a list of sites that this image has appeared on (this is also a good way to see is anyone stealing your images online without permission).

5. Organise your brain and your browsing;
I used to use bookmarks but I really hated them as I always lost sites or forgot what I named them. Pinterest is fantastic for sorting out this kind of information. I have a borad for loads of helpful articles for selling online that includes loads of marketing tips that I can refer back to when I need them. The same goes for card making, sewing tips and cookery. Now when I sit down to make cards I take a look at my board first and scan for inspiration (just like I do with my scrap booking magazines). I also keep a cookery board, so if I can't think of anything to make for dinner I can take a peek at my board and see if anything takes my fancy. I use Pinterest as a place to store ideas until I need them. 


6. Add text to your image;
This is something I haven't quite gotten in the habit of doing yet, but I see it used a lot to great effect. If you are doing a blog post that you intend to pin, or something useful that you would expect others to pin then add text to one of the images. For instance for my blogging article I made images to go with the piece and included the phrase '20 blogging tips' in the picture. There is a pin description, but sometimes people leave this blank, for these instances your pin will still have an explanation embedded into the image. Another tip I read was also to include your website address in the image. This has two benefits; 1. If the link gets lost along the way or someone pins it incorrectly then people can still find your site. 2. It creates brand awareness on Pinterest, if your posts get popular people will start to recognise that brand. 

7. The ins and outs of linking to FB and Twitter;
I have to raise my hand and say I learned this info the hard way. In my settings I linked my account to my Facebook timeline, thinking it would show on my page; not knowing that it would update all my friends about each pin (can I add that I'm addicted so that's a lot of pins). When pinning something it gives you the optiont o share on Facebook and Twitter, you can do this sporadically so you don't spam all your friends. At the start I was frustrated that I couldn't share my business page, but I figured out how to do it. After you pin something a box appears asking if you want to share your pin, click the Facebook one, then go to your page in the drop down menu. 


8. Write good descriptions;
Writing a good description makes it easier for people to search for this item. Even though it's tempting to write 'amazeballs' as the descriptions, ''chocolate sponge with caramel glaze,they are totally amazeballs cookery# baking# cake# chocolate#' will mean that more people will find it. I must admit that when I'm repinning I don't always edit them to make them better for searching, but it's worth the effort. You can also use the @ and # symbols like you do on Twitter.


9. New profiles;
Pinterest just changed their profile layout recently, and you can now choose what image represents your board. Just click the main image and choose your cover image from your pins. Pinterest users are very visual so try to curate your profile like you would an Etsy treasury, I thought about what images and colours matched each other. Also make sure to add all of your relevant links to your profile, I've stated following lots of new blogs and Facebook pages because I've been interested in their taste of Pinterest. I also added my business name in brackets after my own name just in case people don't know me as Ruth.

10. Find out who is pinning you:
I pin quite a few of my blog posts, but other people pin them too, and it's nice too see what is popular. Just type in www.pinterest.com/source/yourwebsitehere/ and you will see all the pins that link to your site.

11. Be Seasonal;
Every time a new holiday/season rolls around Pinterest is flooded with pins for that event, so at Christmas and Valentines there are endless recipes, present ideas, craft tutorials and shopping guides. If you are trying to promote your own seasonal wares or articles make sure to post them early so that they have time to circulate. Or if you like writing craft how-to's then think about the seasons ahead of time and write up some tutorials geared towards these holidays.

12. Share your profile;
Add links to your Pinterest on your blog and business page. Promote it just as much as the other sites that you are part of, if someone finds you on one platform they will want to know where else you are. Make it easy for people to follow you. I even mention that I'm addicted to Pinterest in my twitter profile. You can also add a link to your account to your email signature. Recently I started using social networking icons on my business cards and labels, and on my latest batch I added the P to represent Pinterest.

13. Add the Pin It button to your posts
Sometimes you will see a little red Pin It button on blog posts, this is just like a facebook or twitter sharing button. You can go here to get your button and just paste the html into you post template so that it appears in each of your blog posts like a signature. You can find this in Settings, and then go to blog posts, and paste in the html.

14. Pinterest is a community
You are able to like and comment on pins just like on Facebook. To take part in the community more comment on other peoples pins to interact with them. You can also use the ' symbol to tag another user if you see something that you think they might like, or to let them know you are talking about them. I must admit that I'm guilty of not doing this, but I'm very excited when i do get a comment because it happens so rarely!

15. Set a timer/limit;
Be warned Pinterest is incredibly addictive, and time can easily fritter away. Because of the nature of the site it always leads you to more sites, with more cool stuff, with other links, and so on. They estimate that the average regular user spends 1 hr 17 minutes on it per day. To stop yourself whiling away the hours looking a pretty things set a deadline for yourself, trust me I've learned the hard way.

Helpful Links:
Pinterest deconstructed infographic
Guide to Pinterest infographic
Marketing tips for Pinterest
How to find the original source on Pinterest
7 Ways to use Pinterest
and saving the best til last...
The ultimate guide to Pinterest

Monday, 26 March 2012

Blogging Part Two: 10 Steps to Design


This is Part II of my blogging series, last week I gave you 20 basic blogging tips and today's post is about blog design, stay tuned for the last part next week on promotion. It can be a little daunting when you first set up you blog to decide on a look, especially if you've been reading blogs for a while.

1.Look at other blogs/websites;
This is a good place to start, go to your favourite sites, bookmark or make a pin board of the ones you feel work the best. Judge them on functionality and aesthetics, look at things like colour, layout, and what makes them unique. Finding what appeals to you is the first step in developing your own style. After all this is going to be your blog so you want it to represent you. You also need to figure out what your blog is for, is it crafts, technical, personal, or foodie? Knowing who your audience will be will help you direct the look of the site. The style needs to be appropriate to the topic; a technical one needs to be slick and professional, a craft blog should look textural and personal.

2.Keep your look Consistent:
If you are trying to brand yourself across multiple flat forms like facebook, etsy, blogspot make sure your aesthetic is the same for all your pages. People are visual creatures, and most readers will remember images more than a name. I read so many different blogs that I remember the banner and look of the site far more than the name. If you have your logo designed already make sure it's integral to the colour theme to your site.
In the past year I went through two big design overhauls on this site, to read about them go here and here.

3. Choosing a Template:
Since I'm working on blogspot that will be the focus of this discussion, but the ideas will still hold true for other platforms. Before you do anything you should choose your template. It's in your dashboard under 'template'. There will be an option to choose template, these are basic outlines, the colours and themes can be altered afterwards, so don't be put off by the palette. What you will be looking for is the way the tabs are laid out, are the corners rounded, are there floating transparent boxes? For this blog I used the second option on Picture Window.

4.Get Editing;
Now you can start getting rid of the ugly blogger preferences. Go down to 'backgrounds' and click the picture, this gives you the options to choose one of their images or to upload one of your own. It's nicer to get one of your own as it will make your site far more individual, I generated this polka dot one in Photoshop. You can also choose from endless free ones online like Shabby Blogs or Simply Fabulous (follow the sites instructions if it needs to be installed as a widget). After that go to 'adjust widths', this decides the proportions of your main window and your sidebar. I prefer a wide window as it looks less cluttered, but it's totally up to you. This is also related to 'layout' below, you need to decide if you want a three column or two column layout. Be careful not to have your site too fussy, this is why I go for a right aligned single sidebar, so that there are some gadgets but they don't over power my content. Work through the advanced section step by step picking your font's and colours, try to keep your palette consistent with your logo and background. click apply to blog to save all your changes.


5. Making your Banner;
Your banner should represent the ethos and content of your blog. Look at it like your etsy banner, or facebook cover page. People landing on your site will decide in a couple of seconds if they are going to stay, so try to make an impression. Depending on how wide you have set your width will have determined the size of your banner,to get the pixel size just go back into 'adjust width' in templates and note down the figure. Be careful not to make it too tall, people should still be able to see the top part of your first post before scrolling down. If you are handy with Photoshop spend some time playing around with some designs. I found a great site last week that is giving away free Photoshop templates designed to be Facebook cover images, but these would work perfectly . Alternatively you can use Picasa, Pixlr, or Picnik to edit a photo you have and add some text. I found these pretty free banners that you can add your own text to. Musings of a house wife has a great step by step guide, and for some cool fonts head over to Dafont. If you reach a dead end and aren't happy with what you have done you can pay someone to do it, there are loads of very reasonably priced designers on Etsy, here is one lovely one. When you have your image finished and saved as a jpg go to 'layout', near the top you will see 'header', click this and it will open a window. Click the option for instead of title and description and also tick the box shrink to fit, then save.

6.The Importance of Pages:
Pages are the tabs at the top used for things like 'about me' and 'contact'. It's good to keep all this very important information in an obvious place that is easy to find. It also helps to clear out some unnecessary info from your sidebar. Pages are how people will navigate through your side, so if you have a cookery blog it might be an idea to have an index of recipes here to make navigation easier, same being true for craft tutorials. Try to limit it to about /76 pages so that you can keep them in just one line. If it goes over this go back into template editor and alter the font size of your tabs/pages. Pages come under posts in your dashboard, this is where you can add new pages, either as text or direct links to other websites(be careful with this second option though as you don't want to send traffic away from your site). I only recently discovered that you can publish pages that are not visible on your tabs this is a great way to have information on your blog that you want to link to, but don't want to be visible initially.

7.Make Buttons;
Design some buttons to divide up the space in your sidebar, and to add to the consistent look of your site. I really don't like the appearance of Twitter and Facebook plugins so instead I designed my own buttons in Photoshop and loaded them as a picture gadget. Go to 'layout', 'add gadget', look for the picture option, then add your image making sure to add your Facebook link. I made similar buttons to break up the rest of the space using a links, categories, and Youtube button. Here is a good tutorial on designing your own.

8.Your URL:
Changing your URL isn't essential but I felt it was a very important step to get rid of the .blogspot in my address. This can now be done very easily on blogger and it only cost €10 a year, and don't worry you won't lose all your old fans and followers the traffic is redirected. Go to settings and basic, under blog address their should be add a custom domain. It's been a while since I did mine so I can't really remember, but  I do know it brings you through step by step.

9.Add a Favicon:
This is only a little touch but I feel like it takes you another step to being more professional and not just another Blogspot blog. A favicon is the tiny image that appears at the very top tab above the website address bar, Facebook have their 'F' and Blogger their orange 'B'. Go to layout and above header on the left you will see the favicon loading option. Chose something very simple as this is going to be tiny, I picked my sun and cloud logo.

10.Gadgets;
I know I've talked lots about cluttering up the sidebar, but you still need to have some stuff in their, you just need to decide what is important to you, and what is your order of preference. A search tool needs to be very near the top, it's the default place that people go if they are looking for something. If you are an Etsy seller it's important to have an Etsy Mini so people can see what you make at a glance, at the end of the day that's a large part of why you are blogging. It's also important to have an archive, it saves people trolling through 'older posts' options, and also gives a gauge of how regularly you post. Again these are all decisions you will have to make yourself, but don't worry if you are not happy with them you can just get rid of them later.

I hope these tips helped, if you have any more tips please add them in the comments section, I don't claim to know it all, so I'm sure I've missed loads!

Helpful Advanced Links:
Making an image based nav bar on blogger
How to make seamless wallpaper
Building a better blog

Tuesday, 8 February 2011

How to Take a Screenshot

Hello, Anne-Marie of ByAmor here with the basic, standard guide to taking a screenshot in Windows, in response to a request from Fi of Patchwork Delights.

Depending on what computer package you've got, you may have quicker options for 'snipping' or capturing images from your screen. This tutorial shows the good old fashioned way of doing it if you don't have, or like me, can't seem to find :-], one of those nifty tools.

Let's suppose, for example, that you have been featured in, or curated, a treasury and you wish to post it on your blog. I'm going to use a treasury I made recently, 'Chocs & Flowers for Valentines Day' as an example.

'Image on-screen'

Forgive me please if I state the obvious, but you're going to capture exactly what you see on your screen. So before you do anything, you may need to zoom out ('Cntrl' and the minus sign - ) to fit in the whole image and or, hit F11 on the top of your keyboard to get the image on full screen.What you see on your screen is what you will get!


The 'Print Screen' button can be found on the top right of your keyboard. it may be labelled 'PrtScn'. You hit it, but nothing seems to happen, right? Actually, the entire image on your screen has been saved to a clip board. You just need to paste it into a graphics programme to see it.


After you hit the 'Print Screen' button open up a basic image editting programme such as Microsoft Paint.


Here, go to 'Edit' and click on 'Paste'. Voila! There's the screenshot.

Go to 'File' and choose 'Save As' (not 'Save). Save the image to a folder in 'Pictures'. For some images it's best to save as a Gif, but I have found with treasuries featuring lots of colour the image can come out a little strange, so I stick to Jpegs. Close out of Paint.

'Cropped and auto-adjusted'

Now you can open the image in your Pictures folder using your preferred photo editting package. Crop and edit the same as you would a photograph.

With treasuries, there's not much to be done so I use the basic, ready-installed Microsoft Office Picture Manager to crop, and perhaps adjust the lighting to make the images stand out. With most treasuries, auto-adjust will do the job nicely in terms of colour and light. I find with treasuries, there is no need to resize once I've cropped out the bits I don't need. Certainly, don't go below 500 in width.

Once saved, the image is now ready to upload to your blog just like a photo.


*To learn how to make treasuries, check out this tutorial.

*To express a request for team blog tutorials and articles, please use this blog wish list thread . Any Crafty Ireland team member is welcome to write for the blog, so please contact our Blog Editor, Brigitte of Purls of Colour if you'd like to contribute.

Tuesday, 1 February 2011

How-to: Jewellery Stands

Necklace stands


I came across this on a blog a year ago or so and found it such a help, as I didn’t want to use (and couldn’t afford to anyway) the traditional necklace stands in my table display at markets.


What you’ll need: a large piece of heavy stock paper (i.e. card stock), glue, felt or other fabric, scissors, cutting blade, pencil.


Instructions:

  1. Print out the template below and use it to trace the shape of the stand onto your card

  1. Cut out the shape of the stand from the card
  2. Glue the fabric to the cut-out card (you could also use pretty paper) and trim the excess fabric, so that you're left with the shape of the stand

3. Bend the card into shape - pay particular attention to the neck part of the stand
4. Optional - you can pierce holes on each side of the stand at the bottom and thread elastic/string through these and then tie them together. This helps the stand to stay standing and because they are very light you might want to do this to stop them from falling over/getting knocked over

5. I also suggest you cut a couple of slits on either side of the neck (you could do as many as 4, depending on the type of necklaces you want to display), to hang the necklaces through - this helps to keep them in place and to avoid tangling when multiple necklaces are displayed on the one stand

Earrings stands

These are so easy to make and are great for use at markets and/or at home to hang your earrings, necklaces etc.


Instructions:


What you’ll need: a standing picture frame, fabric, scissors, thin elastic, tape or glue.

  1. Remove the stand, card backing and glass from your picture frame - I love the faux-gilt ones from the 2 Euro shops (and they’re super cheap).
  2. The card backing is usually pretty ugly and plain, so it’s a good idea to cover it in some fabric. I would suggest using a plain fabric - something’s that’s going to show the earrings off to full effect and not take away from them. You can simply tape or glue the material to the backing.
  3. Once the material is in place cut strips of thin elastic and tie them around the frame - you want them very taut. How many rows of elastic you have will depend on the size of the frame and the length of the earrings you’re planning on hanging on it.
  4. Once your strips of elastic are in place and spaced correctly you can replace the stand at the back of the frame
I hope this is useful to some of you. If you have any questions or need more information feel free to get in touch!

Judith

Tuesday, 25 January 2011

Step by Step to Making Etsy Treasuries.

A request was made to post an easy tutorial on making Etsy treasuries. Anne-Marie here, hoping to make it eeeezy peeeezy without over-simplifying...here goes...

Treasuries are lists of items from various Etsy shops curated by Etsy members to showcase and promote each other. They are fun to make, and most of us find them addictive!


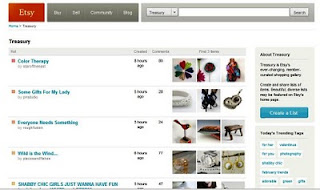
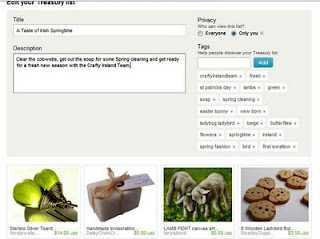
You'll find treasuries when you click on 'Buy' on the Etsy site. Click 'Explore Treasury' to bring up the page shown in this screen shot above. To start your own collection hit the big blue button on the right 'Create a List.'
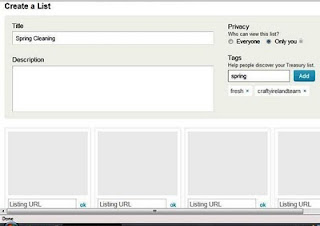
This brings you to the window above. The first thing I always do is set the Privacy to 'Only you' while I'm working away but it's important to remember to set it to 'Everyone' when you are finished. Those who are more experienced and super fast at making treasuries probably don't bother to temporarily hide their list as they can get it done in one short sitting. I however, am slow and do it in stages rather than in one go, so I hide it until it is ready to share.

Give your list a short, title and if you wish, a brief description. You can edit this later if you find the theme evolves a little as you get into it.

Over on the right of the screen you can use up to 18 tags to describe your treasury, much like you tag the listings in your shop. Be sure to use the tag 'craftyirelandteam' for team treasuries so Ruth of Nice Day Designs can find them for the treasury report.

Next, open a new tab or a second browser and log into Etsy so you can find and copy the listings you wish to feature.

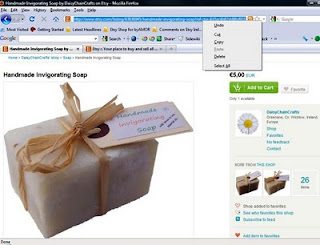
Search for items to include. If you are making a team treasury use the search term 'Craftyirelandteam', perhaps adding a second term to suit a chosen theme or colour. I've clicked into a listing from Daisy Chain Crafts in this example. Go up to the top of the screen where the URL for the listing can be found (highlighted blue in the screenshot above.) Right click on the URL to highlight it and click 'copy'.
Go back to the original tab/browser where your treasury is and paste the URL into one of the boxes labeled 'Listing URL.' Then click 'ok' beside it and the item will be inserted into your treasury.
Keep going back and forth between the two tabs/browsers, filling up your treasury with suitable items. You have up to 16 slots to use. You can move items about by dragging the image from box to box until you are happy with the layout.

A handy little tip is to save the list from time to time so you don't accidentally lose your work going back and forth, and then just hit the edit button on the bottom right to continue. If you do that, best not to worry about the layout until you have filled up all the slots.

It is not advised to include your own items or to use more than one item per shop, especially if you hope for your treasury to reach the front page.

Etsy advises us to 'make it beautiful' and how you do that is as individual as you are :-). If you are not sure how to approach the design, browsing the existing treasuries may inspire you. Some treasuries are based soley on colour and/or theme. Some tell a story. Some have a pattern, others don't. There is no set formula. Afterall, making a treasury is an art in itself.
When you are done, check you are happy with your title and tags, hit save and remember to change the privacy back to 'everyone' so you can share the treasury.

Many treasury curators contact the shops they have featured to let them know. It's not obligatory but it is nice and of course, it means your treasury will be seen by more people, and hopefully shared via their twitter and facebook accounts or blogs.

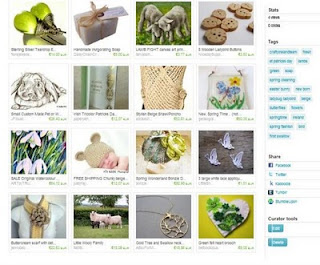
Here is my Springtime treasury if you would like a closer look at all the gorgeous items and shops featured.

The Crafty Ireland Team have a thread going where you can post team treasuries.


Tuesday, 7 December 2010

How-to Register with the Crafts Council of Ireland


The Crafts Council of Ireland (CCoI) is the support agency for the craft sector in Ireland – they are funded by the government via Enterprise Ireland and run on a not for profit basis. Their main role is to act as a champion for Irish crafts.


Why register with CCoI?

If you are registered with CCoI you:

- Can get up to date information on all that’s happening in the sector – via e-mail, e-zines, Stopress (newsletter) and the web site.

- Can get your own page on the CCoI web site

- Can get access to reduced rate insurance

- Can apply for CCoI initiatives – which include: fairs, events, exhibitions, seminars, mentoring programmes, bursaries, research missions and much more

- Can form a network with other makers and apply for funding support

- Can apply to become a member organisation (cost €100 pa) with full voting rights

- Can benefit from PR and promotional activity that CCoI undertake to promote the craft sector i.e. www.give irishcraft.ie

- Can take part in networking events and meet other makers and influencers

And best of all registration is free!


Who Can Register?

CCoI recognise a broad range of craft disciplines including:

- Basketry
- Bookbinding
- Bookmaking
- Candlemaking
- Ceramics
- Tilemaking
- Mosaic
- Fly Tying
- Fresco Painting
- Furniture Making
- Glass Making
- Horology
- Jewellery Making
- Leather Working
- Lettering
- Metal Working
- Mixed Media Constructing
- Musical Instrument Making
- Paper Working
- Papermaking
- Printmaking
- Silversmithing/Holloware
- Soapmaking
- Spinning
- Stone Working
- Textile Making
- Thatching
- Toymaking
- Woodworking

See the www.ccoi.ie for a full list.

To register you simply need to be a craftsperson working in one or more of these disciplines who designs and creates their own work (see the registration form for more detail).

Getting Started

Registration Forms are available from Mary Whelan in CCoI – 056 7796131 / maryw@ccoi.ie or you can download them from www.ccoi.ie. At the moment there is no option to register on-line (its in the pipeline) but you can scan your form and return it by e-mail if you prefer. Mary will be happy to talk you through any queries you have on the forms.

The current registration form is very detailed – but the more information you give the more services can be tailored to you.

If you are a start up business you may not be in a position to fill in all of the business section – don’t worry, just fill out as much as you can.

The information you provide enables the CCOI to tailor a suite of services to your needs and your business type – whether you are a full time craftsperson supplying the consumer market, or a part time maker focused on the gallery / collector end or indeed anything in between…

Confidentiality

All information provided to the Crafts Council of Ireland is held in the strictest confidence. They do not pass your information to any other third party – or any other state agency.

Upcoming Events:

2011 has been designated the Year of Craft and the Crafts Council of Ireland is developing and co-ordinating a range of events and activities to celebrate this.

The World Craft Council will hold their annual conference in Dublin – this will be a 3 day event and elements of it will be open to all CCoI registered craftspeople and member organistations.

So make sure you are registered with the CCOI to find out all that is going on and to join in the activity – or indeed to have your own activities included in the celebrations.

For more information on any of the above contact Nicola Doran, at nicola@ccoi.ie or 056 7796153.

Tuesday, 2 November 2010

How to knit...with denims!


Do you have any old jeans or cotton t-shirts in the house that you no longer wear? Are these too good for the rag bag, but not good enough for the charity shop or selling at a market? Do you hate throwing stuff away and are looking for a way to recycle the material?

Brigitte from Purls of Colour has the perfect upcycling solution: knit them!

I was at the Knitting and Stitching Show in Dublin last week and showed people how to knit with t-shirt and denim yarn, and I now reveal my secrets...


First of all, you need the fabric - this could be cotton t-shirts, a pair of old denims, a worn-out silk scarf or fabric remnants from a sewing project. If you haven't washed any fabric remnants beforehand, I'd advise to wash them to make sure the material doesn't shrink terribly or falls apart. I've just ruined a cushion cover by washing it and I had no idea that it would totally go to pieces.

I prefer working with natural fibre, but I know people have knitted with plastic bags rather successfully. I also tried to knit with ties (and am still working on that one), but again, wash them first, because some silk ties lose shape after washing.


You also need a pair of BIG NEEDLES - yes, needles that put fear into the hearts of men! Size 15 or 20 - if you can get any bigger, go for it! At the last Knitting and Stitching Show, a lady knitted rugs on needles that were the size of broomsticks!


Then you need a pair of scissors and the fun starts. There are various ways of cutting the fabric. Some cut strips and then sew the ends together by hand or machine. Some knot the ends of stips together, but that means you either let the ends hang, or you have to sew them in later on.


To avoid too much sewing or knotting, you can cut your piece in the round or in serpentines to have longer strips.


Yes, you get corners, but they aren't too visible when you knit, and the ones that show look rather arty and interesting.

That's really it. Once you have enough strips sewn or knotted together, you just roll them into a ball and start knitting scarves, hats, bags, rugs...


This is a rug I knitted from cotton t-shirts and cast off with denim (the loopy bits are the corners of strips cut out in the round).


I've even used some denim in my latest Austerity Neckwarmer!

Although I love love love wool, I am beginning to develop a soft spot for knitting with fabric, so there are Purls' creations in the making which mix wool and interesting fabrics.

Tuesday, 28 September 2010

How to plait onions


Today's 'How to' comes from me, aka Brigitte from purlsofcolour, who wants to show you how to plait onions.

What???

Plaiting...onions?

Well, plaiting is crafty and onions are foody, and cooking is also a craft, so...

Most of you have probably seen strands of beautifully plaited onions (or garlic) hanging from kitchen windows or market stalls in France. My neighbour told me she remembers when French onion sellers used to come on the ferry over to England, cycled to the towns and cities with strings of onions around their necks, and sold onions on the plait.

Now you can have a bit of the French lifestyle in your own home!

I recently was at a fabulous place called Laurieston Hall, a co-operative in Scotland which grows most of their own vegetables in an amazing garden.* And there, we learnt that a good way to store onions is to hang them up, so that air can circulate around them. That's where the plaiting comes in.

This is one method I learnt - there is another one, but I had so much fun with this one, I never got round to learn the other way to plait onions...


Grab 12 onions that are cleaned from dirt, with the stalks still attached. Take three onions and place them beside each other with the middle one slightly lying lower than the side ones. Tie a string around the stalks of all three and align the string with the stalk of the middle one - this will stabilise the plait, especially when the stalks are very dry and a bit brittle.


Now start the plaiting of the stalks and the string, as if in French plaiting. Add another onion above the middle one and plait the stalk, then add one to one side, then an onion to the other side, then another one in the middle...plaiting and weaving the stalks in continuously.

A dozen onions is a good size for a plait, but use less if you feel the plait is too heavy and could break - fix the string around the end of the plait and make a loop so that you can hang them up.

Voila!


Onion plaiting is really fun to do and strangely satisfying - it's a hands-on, very 'earthy' job, and you know your belly will profit from it. That surely can't be a bad thing...


There is something really beautiful about lots and lots of plaited onions!

(My stomach aches for onion Quiche or the German Zwiebelkuchen - so yummy!)

When I returned to Belfast, I was looking out for onions with the stalks still attached so that I could plait them, but alas, looks like I have to grow my own for to do that!


*Laurieston Hall will host a craft week from 11-18 June 2011, which will particularly focus on folk arts and crafts that are low tech and use natural or recycled materials. I really want to participate, and I'll let you know when I get more information.