Showing posts with label ruth crean. Show all posts

Thursday, 15 September 2011

Selling Your Work To The Right Person in The Right Place

All of us a crafters would like to know how to sell more of our stuff. We all try hard selling online on etsy, our websites, on facebook and through markets and shops. Recently I've come across a few opportunities that has opened my eyes when it comes to selling my work. I have a wide range of products that I sell at a weekly market, The Milk Market in Limerick City. Even though it has a great footfall and I've tried really hard trying to brand and display my work properly, sometimes I worry that the right type of person isn't seeing my products. For example I might have a cool geeky badge, but because it looks like a girly craft stall a male hipster is not going to stop at my stall. So I lose a sale.

I started thinking more about what type of person would buy each of my items, and then trying to think about where that person shops. I wanted to bring my work directly to the right person, place it under their nose, rather then wait for them to come to me. Here are a few examples of the products that I'm now selling in a different way.


I make an alphabet magnet set for children, they are all my own illustrations, and obviously all handmade. So the kind of person I'm aiming at is probably someone looking to give this as a gift. At a €20 price tag it's not something you pick up on a whim. Also because of the price I'm not aiming towards the Pennys cheap and cheerful buyer. My friend Claire runs Ecobrats an eco friendly business that caters towards a mother and baby's needs. The type of people who buy from her are willing to pay a little bit more for a higher quality product, her customers think about the materials used, and the work that goes into making something. Exactly the type of person who will pay a few quid extra for handmade. On top of the obvious fact that if they are at a baby stall they will be more open to buying baby products. We work together at the market and she kindly suggested to me that she could sell some of my sets, and within an hour she sold a box. Also over the next couple of weeks I will be making christening and new baby cards for her to sell at the stall. She gets a lot of people asking for them. It's better to have them there, rather than if she sent them to my stall they might get distracted by something and forget to come over to me.


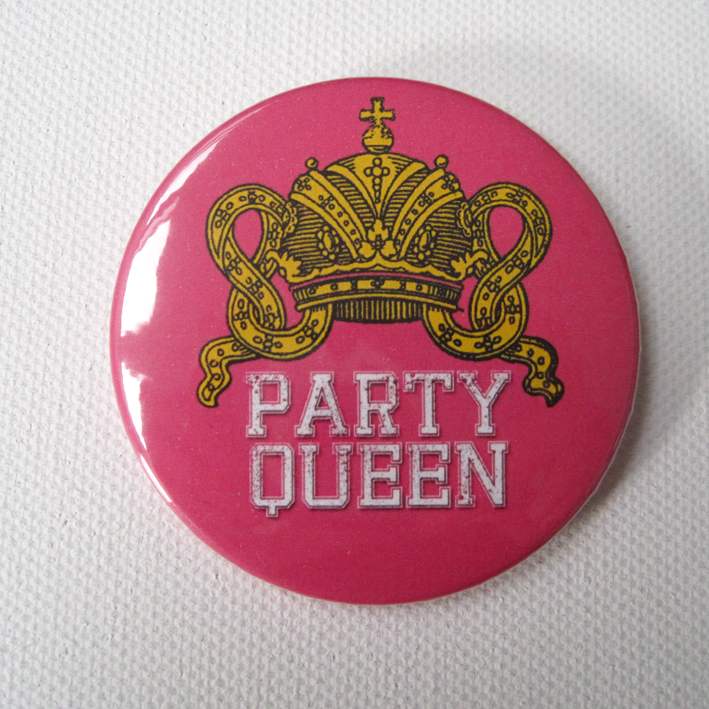
About a year ago I invested in a badge maker to make my own pocket mirrors as I was frustrated with ordering them from the US. In the past year it's really helped to expand my business. One thing that I've been really pushing lately is hen party orders. If someone would have said to me this time last year that hen parties would become my bread and butter I never would have believed them. Part of what has helped spread the word was contacting bridal and hen party websites and facebook pages directly. Rather that hoping that prospective brides would find me I went out and hunted them down myself. It was free and very easy, I just sent off a bunch of emails. If websites got back to me and asked me to pay a fee for advertising I politely declined; there are plenty of bridal blogs looking for things to write about that will do it for free instead.


There is a a vinyl stall at the market I sell at. I approached the stallholder a few weeks ago to see if he would mind me putting a board of rock and pop badges at his stall. We go 50/50 on the sales so both of us are happy. Since putting out this board a record shop has approached me about doing a similar deal with them. It was simple idea that grew legs under it-music people go to record stalls, music people love badges-simple! (Note: I know I'm breaking copywrite laws with these, but I figure Bono won't mind about a little stall in Limerick making a few quid, I won't be selling them online, and won't stock anywhere else with them).

 Facebook is an amazing marketing tool. It was Pride week in Limerick last week, I was very disorganised and only made up a batch of Pride designs the day before the parade. But I snapped a few pictures, uploaded them to facebook, and then sent a link of the album directly to the organisers of Limerick Pride, LGBT, and a few others. I had quite a few customer who came to my stall the next day to specifically buy them. After I finished work I pinned all my badges to my canvas bag, walked down to the after party and sold them to people on the street. I figured I'd make a few extra quid on my walk home! Again I went directly to the person who I knew would buy my stuff, rather than wait for them to stumble upon me.

Try to think about what you make, who would buy it, where that person normally shops, and how to get your products into that place. It's all about the right context. Has anyone else had experience with this kind of thing? I love to hear your feedback..


Tuesday, 4 January 2011

It's a New Year, What are your Resolutions?

I hope you all had a lovely Christmas and that you ate your fill of turkey, sweets and biscuits. But now the new year has rolled around again and lots of people are making resolutions. Every year we all promise ourselves to try harder, and set crazy tasks to complete in the year. Last year I wanted to get 100 listings in each of my shops and to hit 100 sales, thankfully both of those things happen. I also said I would learn how to drive...but as yet I'm have never sat behind the wheel of a car..oops, ah well, maybe this year. Here are some of the things I want to get done this year...and I'd love to hear all of your New Years resolutions too!

I would love a holiday, not necessarily to Paris, I'd even settle for a weekend in Galway. It's been years since I had the time or money to take a holiday but this year I really want to get away from everything and give myself a well deserved break. This resolution might go hand in hand with trying to win the lotto though!

I don't have a huge garden, in fact it's more like a decked corridor between my house and my garage, but I've been meaning to plant some flowers for ages. But I don't ever seem to make time for it. I haven't inherited my mothers magical green fingers but maybe this year I'll give it a shot. Even I like to grow some herbs as it's so handy for cooking.

This is a rather unusual one, mostly people say things like 'I must work harder', but for myself I have the opposite problem. This is a resolution to spend more time with friends over tasty pints ( I prefer Beamish, but Guinness will do nicely too). I find that there is always a million orders to catch up on and the temptation is to stay locked away in my studio working all the time. But I have a great group of friends that I need to make more time for. Years ago I remember watching an episode of Oprah and she was talking to a man who was a workaholic and she said 'on your death bed you are not gonna wish you spent more time at the office, you will wish you spent more time with your wife and kids, enjoy that time now and don't waste your life working all the time'. It was one of those things that really stuck with me years later.

These next few pieces are about getting organised. Part of having more social time will mean managing my work time better. I bough one of these fab wall organisers from Design Birdie and last year I got one of these sweet pencil cases from 2Boos. This year I will hopefully go full time at Nice Day Designs so things like spread sheets and all other grown up accounting things will have to happen. It's a bit terrifying but I'm sure I'll be able to figure it out.


My boyfriend is currently living down in Cork for college, and that means that my good friend Cecily has moved in to share the house/rent. Having a house mate that isn't my parter has made me much tidier and more considerate to live with, I actually wash the dishes instead of leaving them in the sink! I want to continue with this through the year, and when John moves back I'll try not to get lazy again...I can only promise to try though!

Tuesday, 7 September 2010

How-To Tuesday: Shrinky Dinks


Hi this is Ruth from Nice Day Designs, it been a while since I posted anything here on the team blog, *waves* to all the new readers.


It was about 2 months ago that I first spotted 'Shrinky Dinks' in some craft tutorial online. I was totally fascinated by them, and the more research I did they seemed too good to be true. Basically they are a plastic that you draw on, stick them in the oven for a couple of minutes and they get 7 times smaller and 7 times thicker!! They go from a thickness like ascetate to a sturdy clear plastic. There are endless possibilities, from earrings, card embellishments, ornaments etc etc. Apparently they are huge in the US and all American kids play with them, but I had never heard of them before or seen them in any craft shop here.


I tried to order some directly from the website but they were going to charge me $40 shipping on a really small item. Instead I had a look on ebay and found 'Shrinkles', a 'shrinky dink' substitute, the same product but with far more affordable shipping.

I got the transparent and opaque versions, both in packs of 50 for a total of about 20 euro. To get a decent sized image I used an entire sheet per piece. For the transparent shrinkles I had to use 'Sharpie' markets, I was able to get a set of these in my local craft shop Silkes for 10 euro. But for the opaque ones regular colouring pencils are fine.

I was delighted with how they turned out, shrinking an image always makes it look way better as the detail is condensed. I included a euro coin in the photos so you can get an idea of the change in scale. Also since they are transparent they would be very easy to trace images if you are not that confident at drawing.

After making lots of them I've decided I prefer the opaque ones as you can get more detail and texture with the colouring pencils. Recently someone saw the cards I made with them and I've been commisioned to do a large scale artwork with them pieces lots of panels together...I'm excited to get started on it soon.

Wednesday, 3 March 2010

I'll Show you Mine Wednesday

Hi this is Ruth from Nice Day Designs, today is a slight deviation on the 'I'll show you mine Wednesday' of photos of our studios, as it is a look into a retail space I sell in. This week I went down to Kilkenny and dressed and organised a new shop that is selling my customised clothes and accessories. It's called Roisins Beauty Salon (as there is a salon upstairs) and it's in the picturesque village of Inistioge. So here is a wee peek at the shop and what I did with the window dressing.
The key was to try and get a bright and colourful boutique feel on a small budget. I used lots of material and netting, and some inexpensive hat boxes which I covered with nice brightly coloured paper. Luckily the shop had a great purple door and window before I arrived, and a good blank canvas of white wall on the interior. I used netting and some wicker baskets on the fireplace to add a splash of colour. I got the baskets in a pound shop, and added to the blue polka dot fabric afterwards to make them a little funkier. They are great for displaying accessories, and I think they would work just as well for displaying knick knacks on a market stall-for all of you market people out there.

I added the faux curtain to the back of the shop by thumtacking the material in place, I love how it brings more colour into the back of the shop. Ideally I would like to paint the doors either white or the same purple as the front door, but there just wasn't time. Eventually I would like to add a painting on canvas over the firplace, based on photographs of one of my models. I will also be sending Roisin some more fashion illustration to decorate the shop. I think it adds to the look of the place, and if someone wants to buy them even better! So fingers crossed all the hard work pays off! If you are in the area of Kilkenny I would recommend a visit, it's a beautiful little village and it's only a 20 minute drive from the city.

Thursday, 4 February 2010

I'll Show You Mine...Nice Day Designs

Hi this is Ruth from Nice day Designs and Nice Day Supplies, and here is a peek into my studio. I was really lucky when we moved into this house last April, the recession was good to us in the fact that rent prices came down. So we were able to afford a second bedroom that I could use as a studio. Cheekily I took the large master bedroom, that uses up the whole top floor of our house. I really love the high ceilings and exposed beams, and all that great storage was already here when we moved in.
As you can see I have A LOT of stuff, I work in many different disciplines, so this means I need tonnes of supplies. I try to keep it somewhat tidy, but it's a contstant struggle to control the chaos. Since I've started selling supplies I now have loads of extra boxes in the space that I really haven't found a proper place for yet. But I'm hoping to take a trip to Ikea soon, and all my troubles will be over then.... hopefully!
I attempted to make the place look a bit tidier for the photos, but I realised I will never have one of those pristine spaces. It think this room looks a little like the inside of my head, lots of things/ideas going on, lots of colour, and a bit scatty, but with a strange kind of logic. Having said that it looks a lot better than during the start of January, which had the left over carnage from the Christmas madness. I also hung up a few extra drawings/paintings that I had lying around, left over from exhibitions. It's nice to have pretty things to look at, I must also get myself a notice board so I can make some cool collages....oh another thing for the list!!
I feel really lucky that I have loads of space to let the business grow, it's heaven working there all day. Most of the time I'm squirrelled behind my desk sewing and listening to my audiobook. I also have a second work desk set up, because over the past year I've had a few people come in and do work experince, which is nice to have a bit of extra company.
Hope you liked my little tour!
Nice Day Designs
Nice Day Supplies
Nice Day Blog

Thursday, 21 January 2010

Trade Secrets...Limerick Suppliers

Hey there this is Ruth from Nice Day Designs and Nice Day Supplies, and I'm gonna show you a couple of my favorite supplies shops in Limerick. I buy an awful lot of my supplies online but nothing beats going to the shop and having a browse around a lovely supplies shop. The fact that I can see and touch things always makes me buy more. I work in quite a few diciplines, from making handmade cards, painting, sewing, and felt crafting. So I'm really glad that I have these two local shops just 5-10 minutes walk from my house.

Firstly there is this darling shop M-Sign that is on Mallow St in Limerick city centre. My first memory of this place is when I first moved to Limerick, and I walked down with my list for college clutched in my hand. They were so helpful and nice, I felt like a kid in a candy store. I love the work that Toni and Mary do, they are both so lovely, it's the kind of service you dream of getting in every shop. Their main focus is supplying materials for the art college students, and also for schools. They have a good range paint, pens, card, brushes and miscellaneous tools. Only the other day I picked up some great small canvases, and great scissors that cuts some funky shapes.

M-sign offer 10% discount to students, their email address is msign@eircom.net, and they open 9-5.30pm Mon-Fri and 11-1pm on Saturdays.

My second port of call is 'Silkes-One Stop Stationary' which is on Catherine St. right in the city centre. It has three main things that it sells: art supplies, teaching aids/crafts/supplies, and office supplies. There range of crafts covers a wide range of paints, canvases, card making supplies, sketchbooks etc. This is a really handy shop to go to if you have lots of different things you need to get. I quite often need to get office supplies for the business and it's great that I don't have to go to another shop to get staplers, envelopes etc. It is a pretty large shop, and it's not unknown for people to spend nearly an hour in there browsing through all of their goodies!

I'm always asking for really awkward things in there, in bulk amounts and the staff are always very helpful. They offer a 10% discount for students and teachers (not including the stationary) and they also sell online,check out there website here, and they are open 6 days a week.

Wednesday, 6 January 2010

How-To-Tuesday...even though it's Thursday!!

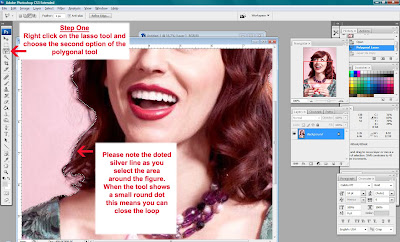
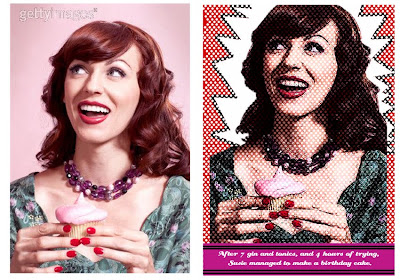
To follow this tutorial you will have to have some knowledge of Photoshop, but I tried not to use anthing too complicated, so most people could give it a shot. If you have any further questions do not hesitate to leave comments and I'll try to answer your queries. I use variations on this technique a lot, it's very handy for making posters and invitations. I even once made a comic book style present for a friend using a photo of him. I think it could be a fun present to make for a teenager. The image I used for this project I got for free from gettyimages. Here is a before and after of the original picture.Step One: Open your photo file. Go to the lasso tool section, right click and choose the second item, this is the polygonal tool. This will allow you to click on multiple points of an image linking them altogether to eventually select a shape, like cutting her out with a scissors. The aim here is to select the woman so that we can get rid of the pink background. With a plain image this can me done with the magic wand tool, but a lot of the time the background is more complicated. I started with the left shoulder and worked my way slowly around the shape clicking every centimeter or so (note do not click too quickly or it will close the loop, take it slowly!). At the end when you come full cirlce a little dot will appear on your tool, this means when you click the start point the selection has been made. While floating your mouse over the selected area right click and choose 'layer via copy'.


Step Two: Make a new document, A4 in size and 300 dpi ( 29.7cm height, 21 wide). Use your move tool to move your selected ladies head over to the new blank document. It may be much smaller but this is ok cos it can be stretched. Make sure the 'show transform' tool is clicked as shown above, this means there will be a box surrounding your image. Go to the bottom right hand corner and while holding down the shift button scale the image up to A4. At this point the image will pixalate, but after you press the enter button it will be fine. This kind of stretching is fine for this project because we will be altering the image a lot so the quality doesn't have to be very high.

Step Three: You need to duplicate the layers 4 times. The above image show you the layers window. When a layer is selected it is highlighted in blue, right click on your image layer and 'duplicate layer', repeat this step two more times, so you will now have 4 copies of your image. Select the third image down, ie two above your background layer. Go to 'filter', then choose 'artistic'. A dialogue box will open, on the right hand side there will be an option that says 'fresco', click this and set the levels to 'Brush Size=8, Brush Detail=4, Texture=3'. Note these levels can played with to suit your image, it depends on how much darkness you want. In the layers box you will see 'opacity' set this to 80%. Next with the layer above that go to 'filter', then 'artistic', then choose 'watercolour' as an option. Set the levels at the following 'Brush Detail=14, Shadow Intensity= 4, Texture=3'. In the layers box set the opacity to 50%. With the top layer go to 'filter', then 'artistic', then 'poster edges'. Set the levels to the following 'Edge Thickness=7, Edge Intensity=6, Posterisation=5'. In the layers box beside the opacity it says the word 'normal' scroll down until it says 'multiply'.

Step Four: With the watercolour layer selected go to 'Image', then 'Adjustments', then 'Replace Colour'. The above dialogue box will pop up. Select a lighter tone in the image, I chose her cheekbones, set the fuzziness to medium/high, and set the lightness to 75-100. This is to bump the contrast between the colours in the image without it being too garish. If needed repeat this step with the layer immediatley underneath.


Step Five: Select your paint bucket and while your background layer is selected fill in all of the layer with a bright comic book colour. I went for primary red. The next part is to add in the white dots. In this case I was very nice and made up a template for you as it would take too long to explain how to make it, and it's really boring!! So just save the below image and when you bring it into photoshop magic wand out the black to delete the background. The magic wand is the 4th tool down, simply click on the black and then right click, then 'select inverse', then right click again and 'layer via copy'. Move this white dotted layer into your image with the move tool. Place it two layers above the background, ie above one of your image layers so the dots overlap the face, but don't overshadow it too much. To move a layer up and down, go to the layers box, select it and hold down left click while you drag it up/down.
Step Six: You can add a popping white star burst to the background using the polygonal tool. First create a new layer above your background. Do this by pressing the icon beside the bin in your layers box while you are on the background layer. Then use the polygonal tool to roughly make the star burst shape, after that paint bucket in some white. After this go to 'select', then 'modify', then 'grow' and type in 20. Change your main colour to black and paint bucket once more and you should get a black rim around the star shape.


Step Seven: Lastly add a funny text box to the bottom. Write what ever you like here, or maybe an annoucement for a poster. Make a rectangle with the shape tool (which is below the move tool). Add a new layer above your background and paint bucket the shape, and add some lines to the top and bottom with the line tool. You can change the thickness of the line by typing in different numbers in weight (which is under help). Select the text tool, left click and drag into the shape of the rectangle and get typing! I find a good comic font, or something retro looks good here, there are thousands of free fonts online if you wanted to download some cool ones.

Ta Da!! That's it!

Posted by Ruth of Nice Day Supplies and Nice Day Designs

Sunday, 8 November 2009

Introducing: Nice Day Designs

Hi all, my name is Ruth Crean of '...Nice Day Designs', and I'm one of the new members of the Etsy Ireland Team. If you've got a few minutes to spare you can fritter them away while I self conciously babble about myself and my work.
I'm originally from Celbridge in Kildare but I moved down to wonderful Limerick 9 years ago to attend the art college here, and a mix of a great social/cultural scene and the love of a good Limerick man has kept me here since. I originally studied Fine Art: Printmaking, but in my final year I dabbled in photography and model making. Since graduating in 2004 I have tried my hand at many aspects of visual art, having a few exhibitons in photography, painting and digital collage. I spend about two years working with a great company, Impact Theatre, doing all their graphic design for them. With them I learned tonnes about design and creativity as applied in practice in the real world. It was while working with them that '...Nice Day Designs' was originally born, as a label for my design and for my handmade cards that I had started making.

In 2007 I started selling my cards and illustrations at a local craft market here in the city. It was after a year of this blind optimism that I realised that I would never make my first million selling cards, so I decided to capitalise on my life long hobby of sewing and customising clothes. My mother is a dress maker and it was something I always did on the side, either brightening up a jacket with a few buttons, or making halloween costumes. Things started out very small and tentatively, with one rail of clothes, and a few listings on Etsy. But quickly things grew and there was a growing demand for the clothes I was making.


At first to be honest I didn't have much focus but after a few months I realised that I should promote the fact that they were recycled clothes, as I started to see the growing trends in greener products. Since those first couple of steps I have started selling in a few boutiques around Ireland, and I was lucky enough to be on RTE's Nationwide earlier this year. In Autumn this year I had my first fashion show, which was a daunting and amazing experience. Since the show finished I've been catching up on custom orders and trying to get my cards and accessories sorted for the Christmas rush. Since then I also got my hands on a large lot of vintage buttons which led me to set up my second Etsy shop nicedaysupplies. I was really fortunate to find them, and I know it will take me years to get through them but I am a complete button addict!
It's been a tricky balance with all the different things that I work with, but that's what I love most, one day I could be sewing an evening dress, the next designing my pocket mirrors, and another day making Christmas cards. It means I never get bored and all the different techniques keep me inspired for the next project. I know this sounds nuts but I'm happiest when I'm working away in my studio, with a hot cup of coffee, and listening to a good audiobook.

Unfortuneately I don't have any of my clothes in my Etsy shop at the moment because I have prior commitments to shops to get through first, but check out my blog for more pics from the fashion show.
http://www.nicedaydesigns-ruth.blogspot.com/
http://www.nicedaydesigns.etsy.com/
http://www.nicedaysupplies.etsy.com/

Thanks for reading!