Showing posts with label knitting. Show all posts

Monday, 6 January 2014

Designer Profiles 2014

Hi there and Happy New Year to one and all.
Mug rug by Patchworkdelights with egg cosies by /HuggleKnits
Welcome to the monthly article highlighting some of the amazing designers at work here on the Etsy Ireland team.  Each month I hope to introduce you to one or more people at work in a particular field of crafting - maximum of 5 in each area.
Doggy soap from  Cloud9HandmadeSOAP
Over the last year we met some amazing crafters from many parts of the country, both north and south, and were shown some of their amazing creations.  
Doing a Downton from  QueenofCuffs
We also learned how they started on their crafting path and what inspired them.  
Warm and Wollie from  SelkieCrochet

Here is the Calendar of Monthly Designer topics for the coming year.

February   - Jewellery
March        - Toy-making and baby clothes
April           - Vintage
May            - Paper craft 
June          - Textiles incl Weaving and Spinning
July            - Woodwork and Rushwork
August       - Sewing incl Patchwork
September - Knitting and Crochet
October     - Other Crafts
November - Christmas Crafts
December -  To be decided

If you are involved in any of these crafting areas and would like to be included please contact me at my shop huggleknits.  I would also like to include anyone who makes or has supplies for these crafts to be included so do let me know what you have and how we can contact you.

This is now down to you - if I dont hear from you, you wont be included so do get in touch.   And remember there is a limit of 5 being showcased in each area so get your name in soon to avoid disappointment.  Lets show the world what great designers we have in the Etsy Ireland Team.

Cheers for now

Mo 
huggleknits


Thursday, 2 December 2010

How to knit a baby jumper

Today's How to comes from MrsMouse just in time for the wintry weather! Enjoy!


Last night, I was talking knitting with a friend. We're both late twenty-somethings, I have been knitting most of my life, she's recently come to it through her Grandmother's persistence that she should experience the joy of making something for her new baby (her first).

So far, my friend has enjoyed knitting scarves, but is unsure both on casting off and is put-off by the overwhelming nature of patterns.

This is the set of instructions (rather than a potentially more overwhelming pattern) I designed for her in order to make a jumper for her baby. These instructions should work on most children from birth (including preemie babies) to two years and may also work up to three for some children.

I have referred to the baby as "her" throughout, but the same instructions should work for a boy baby just as well.

To begin with, there's one tricky part - measuring the baby! You need 4 measurements:


1) For the width of the jumper you can pretty much just measure the waistband of one of her nappies and add 5cm each side.

2) Then you need the measure from her armpit to as long as you want (if you go to kind of mid thigh she'll still fit it when you've made it).

3) Next you want the measure of her shoulder to her middle fingertip if you can get it (if not go to her wrist and add 5cms).

4) Last, you want to measure the width of the cuff of the coat she's in now (will be about the same as the next size up for her in jumpers).

Once you've got those four measurements, it's dead easy:

Pattern


a) Cast on enough stitches to get the width of the jumper.
If you want to, you can do 2-3cms of rib (k1,p1 along each row) or you can just knit in stocking stitch all the way up as per a scarf.

b) Keep going until it's the length of measurement 2.

c) If you have an even number of stitches, work out where the middle 4 are. If you have an odd number, it's 3.

On this next row, when you get to the middle 3 (or 4) cast them off. (Have put a note at bottom how to do this) Then keep going to the end of the row.

d) At the end of the row, cast on enough new stitches to get measurement 3.

e) Work just on this one sleeve (you can either just forget you have the others on the needle or grab a spare so you don't have to use the one they're on) until it's half the length of measurement 4. (or the nearest row heading towards the middle at about that point).

f) On this next row, when you get to the stitches that make the body part of the jumper (it should've started looking like a T shape by now so you should be able to tell which ones are sleeve and which are body) only knit half the body stitches and cast off the others (note at bottom). Cut off the yarn leaving a tail (easier to tidy up later).

g) Go back and make the other sleeve the same way.

h) When you get to this point, cut off the yarn so you leave a tail hanging (easier to tidy up later) and can start the yarn back at the beginning of the whole row again (both sleeves are now a whole row)

i) Work across one sleeve, then cast on as many stitches as you cast off at the neck edge, then work across the other sleeve.

j) knit all these stitches until the sleeve is the length of measurement 4.

k) Next row: Cast off the sleeve stitches, knit across the body section, cast off the sleeve stitches on the other side (note on casting off at end).

l) work the remaining stitches until this body panel is the same length as measurement 1 & cast off (note at end).

NB - If you go for the rib waistband at the start, you really need to do the same at the end too.

Fold the whole thing in half and sew the sides.


Casting off: (Called binding off in some patterns)


Knit first two stitches. Focusing just on those two stitches on their own needle, catch the back one and bring it over the one in front and drop it off the end of the needle. It should pull tight on the one that's left (but not too tight). Knit one more stitch and repeat. Keep repeating all the way across.


I quite like to add a blanket-stitch around the edge for decoration, but that's just my taste. You can easily visit sites such as ravelry.com, Youtube.com, or Facebook.com for free guides on how to decorate your knitting, with everything from stripes, to decorative embroidery. This can also seem overwhelming at first, I know, but once you've made your garment, it really is worth making the effort to make it look exactly as you pictured in your mind's eye, whether that's plain, or patterned.

Tuesday, 2 November 2010

How to knit...with denims!


Do you have any old jeans or cotton t-shirts in the house that you no longer wear? Are these too good for the rag bag, but not good enough for the charity shop or selling at a market? Do you hate throwing stuff away and are looking for a way to recycle the material?

Brigitte from Purls of Colour has the perfect upcycling solution: knit them!

I was at the Knitting and Stitching Show in Dublin last week and showed people how to knit with t-shirt and denim yarn, and I now reveal my secrets...


First of all, you need the fabric - this could be cotton t-shirts, a pair of old denims, a worn-out silk scarf or fabric remnants from a sewing project. If you haven't washed any fabric remnants beforehand, I'd advise to wash them to make sure the material doesn't shrink terribly or falls apart. I've just ruined a cushion cover by washing it and I had no idea that it would totally go to pieces.

I prefer working with natural fibre, but I know people have knitted with plastic bags rather successfully. I also tried to knit with ties (and am still working on that one), but again, wash them first, because some silk ties lose shape after washing.


You also need a pair of BIG NEEDLES - yes, needles that put fear into the hearts of men! Size 15 or 20 - if you can get any bigger, go for it! At the last Knitting and Stitching Show, a lady knitted rugs on needles that were the size of broomsticks!


Then you need a pair of scissors and the fun starts. There are various ways of cutting the fabric. Some cut strips and then sew the ends together by hand or machine. Some knot the ends of stips together, but that means you either let the ends hang, or you have to sew them in later on.


To avoid too much sewing or knotting, you can cut your piece in the round or in serpentines to have longer strips.


Yes, you get corners, but they aren't too visible when you knit, and the ones that show look rather arty and interesting.

That's really it. Once you have enough strips sewn or knotted together, you just roll them into a ball and start knitting scarves, hats, bags, rugs...


This is a rug I knitted from cotton t-shirts and cast off with denim (the loopy bits are the corners of strips cut out in the round).


I've even used some denim in my latest Austerity Neckwarmer!

Although I love love love wool, I am beginning to develop a soft spot for knitting with fabric, so there are Purls' creations in the making which mix wool and interesting fabrics.

Thursday, 29 April 2010

Full Circle : Irish Traditional Crafts

Chapter 3 - Knitting

The origins of knitting are more or less lost in the mists of time but it is supposed that it was started by the Arabs more than two thousand years ago. In the middle ages knitting was an occupation carried out by men only and the craft was administered by Guilds - to become a master knitter a boy was required to undertake 6 years of apprenticeship.

Many countries specialised in a particular type of knitting and some have given their name to it - e.g. France/Belguim = lace knitting; UK = hoisery; Scotland = fair isle and Ireland = aran knitting.
Two reasons are given as to where the name came from for what is now known world wide as Aran knitting. First = it originated in the Aran islands off the west coast of Ireland: Second = after the Great Famine the Conjested Districts Boards were set up to give people employment. One board was set up in Ballina , County Mayo, by a Lady Arran who organised women to make hand knit jumpers and sweaters using the embossed stitches of the day.

The following are just a very small selection of the traditional stitches:

Moss Stitch - said to reflect some of the seaweeds found on the west coast of Ireland and to symbolize abundance.


Cables sybolize the fishermans rope for safety and luck at sea.


Marriage Lines - double zig zag lines symbolized the ups and downs of married life.

Diamond when linked with cable stitches are said to link success in livelihood with hopes of prosperity.

Honeycomb to signify focus on work like a bee is focused on gathering nectar.

Traditionally sweaters were made with undyed wool yarn called bainin spun directly from the local sheep. Often the wool still contained much of the natural lanolin which had waterproof qualities and ensured that those working outdoors would be warm when days were wet as they often are here in Ireland.

For further reading on this wonderful tradition see:
  • The Aran Sweater by Deirdre McQuillan.

One of our Crafty Ireland Team members is producing wonderful aran items for children http://www.etsy.com/shop/IrishWoolen This is one of her sweaters.


I did hope to have a little information for you this month on the tradition of crios weaving but it is taking me a bit longer to source some information on it and to try my hand at making one. Hopefully I will have one for you next month as well as an introduction to Irish crochet.
In the meantime if you have any comments please let me know. I am always glad to hear from you. On a personal note I have been taking some time out from my shop in the last few weeks to have a short holiday and to revamp my range. I hope to be back on line next week.
Cheers, until next time
Mo
aka Huggleknits

Thursday, 25 March 2010

Full Circle - Irish Traditional Crafts

Chapter 2 - Natural Dyes and a taste of hand Knitting

When I left you at the end of Chapter 1, I had spent some time on Clare Island (off the west coast) and had spun some amazing yarn from the local sheep. So now I had skeins of spun wool and while the natural colour appealed for many projects, it was time to add a little colour.....

For centuries natural dyes have been extracted from roots, stems, leaves, berries and flowers as well as from shell fish and insects and often the formulae were closely guarded secrets handed down through families. One of the most prolific dye sources are lichens which are plant organisms made up of fungus and algae and are usually grey, green or yellow in colour. Traditionally it was the childrens job, after a shower of rain, to collect the wet lichens and, as it was thought to be unlucky for any man to touch the dye pot, only women would dye the wool and cloth.

For the purpose of my learning curve I was brought through the process of dyeing the new spun wool with onion skins. First a full pot of the skins, half filled with water is brought to the boil on the stove. The unwound skein of wool is wet thoroughly, alum is added to the water to fix the dye and, once soaked, it is put into the hot pot and simmered gently for up to an hour.

The skeins are then rinced gently and put outside on the wall to dry in the sun. Further skeins of wool can be added to the pot, undergo the same process and each will come out a lighter shade of orange/yellow. The results are amazing.
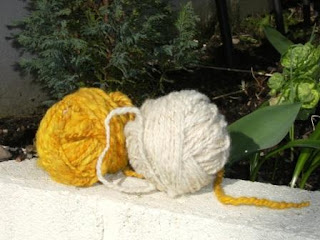
Once your yarn is dried and wound it is ready to be transformed. My grandmother would use some of the undyed wool to make socks and jumpers for the family. The remainder would be send to the local weaver to make blankets (more on weaving in a later article).

Below is a cushin cover I knit using some traditional aran stitches i.e. cables and blackberry. In my next article I will explore the origins of handknitting in Ireland and also have a look at the weaving of the multicoloured sash or belt known as the crios.

As always I welcome any comments on this article and ideas for future explorations. If you are a crafter who would like to be linked to any of the series of articles please let me know.

Till we meet again, take care.

Mo
aka http://www.huggleknits.etsy.com/

Next article due 29 April.........

Thursday, 28 January 2010

Huggleknits gets some Vodafone exposure!

Congratulations to Mo from Huggleknits ... one of her stripey hats is featured in the current Vodafone knitting ad. How cool!

You can watch the ad on YouTube. Well done Mo!