Hi All
Another lovely day in the West of Ireland promised today - apologies East & South of the country!
Eimear from Ella Green Jewellery has been on and recommended the following article on Google + which makes an interesting read!
http://www.businessinsider.com/surprising-no-one-using-google-is-the-best-way-to-boost-your-websites-search-ranking-2012-4?nr_email_referer=1&utm_source=Triggermail&utm_medium=email&utm_term=SAI%20Select&utm_campaign=SAI%20Select%202012-05-01#ixzz1tblDrHcM
She also pointed out that Etsy have recently acquired Trunkt which is a facility to allow wholesale sales.
Here is a link to the discussion thread on Etsy - www.etsy.com/teams/7718/site-help/discuss/10226047/
And here is a link to an article on Techcrunch relating to the topic - http://techcrunch.com/2012/05/01/indepdent-crafts-marketplace-etsy-acquires-artisanal-goods-wholesaler-trunkt-moving-into-wholesale/
Thanks Eimear for keeping us all up to date on these issues!!! If anyone else wants to get in touch, or put something up on the blog please let me know via my shop Cari Design on Etsy!
Have a happy day everyone!
Caroline

Showing posts with label CariDesign. Show all posts
Showing posts with label CariDesign. Show all posts
Thursday, 3 May 2012

Thursday, 16 February 2012
Thank You Notes: A Simple How-To
Thank You Notes: A Simple How-To
This is republished with thanks again to Ruth from Nice Day Designs!

I include thank you notes with all of my online orders. I always make them in bulk though so I have them ready to hand when I get orders. It's a nice little touch that makes my work stand out from the crowd and makes it more personal. People shop on Etsy for these little extra handmade touches, it's part of what sets it apart from buying from faceless multinationals.
In an effort to keep costs low I make my own rather than buying them. I always take notice more of a handwritten card, rather than a business card thrown in with the order. Here is a simple how-to for how I made my most recent cards:
You will need:
Scissors
Ink pad (two colours preferably)
Clear stamps of your own choosing
X-cut corner cutter (optional)
Blank Cards (small) I used something similar to these
Envelope (optional but it makes it nicer)
Printing sticker paper (optional)
1. Since I make cards I also have a lot of odds and ends or cards lying about the place. I have chosen to cut them in half so I can get better value for money. For a neater finish cut either side on the centre crease, making two cuts.
2. I love rounded corners on cards, I think it adds something elegant to them, I know it's more work but it's worth those extra few minutes. You can get one here at a reasonable price, and it's great value for money, I use mine all the time.

3. Since I sell crafty items I chose a scissors and thread stamp from my collection (I also like that it kind of matches my tattoo). I've been building up my collection over the past year because I make cards, but you can easily pick these up in your local craft shop. I first stamped my image using black ink. I then found a thank you stamp and used red ink for the lettering to make it stand out more.

4. It's always important to keep on branding yourself. I made up these little stickers in Photoshop in a few minutes. I added my website address below my logo, and also the Facebook, twitter and blogger logos so people know they can search my business name and find me. This is a lot tidier than typing out all the addresses, handy when working with a small space. Weirdly I picked up a pack of 10 sheets of sticker paper in my local €2 shop, and I can use them in my printer at home which is really handy. I fit about 40 of these stickers on a sheet, the sheet costs €0.20, so that works out cheap as chips!

5. I put the sticker on the reverse of the card, and write my message of thanks to my customer just below it.
I hope you all found that as useful as I did. Much thanks again to Ruth for allowing us to republish it.
If any of you have any information that you would like to see included in this blog or if you have any articles, advice or tutorials that you think might be useful please get in touch with me, Caroline, through my Etsy Shop Cari Design.
Thanks again
Caroline
Tuesday, 7 February 2012
Packaging Orders - Some Useful Tips
Hello
I would like to thank the lovely Ruth from Nice Day Designs for allowing me to republish some of her articles/tutorials - they are full of useful information and advice

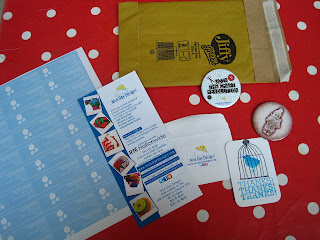
As much as possible I try to make systems for all of my work so that things run smoother. I'm not naturally inclined towards being organised so I've spent years training myself to do this to try to make running a business less stressful. When I first started selling on Etsy getting orders was both very exciting and hugely time consuming. The first few orders I got, I had to walk down town to buy packaging, then spend ages rooting out the Sellotape. Thankfully things have changed, now I have what I like to call my 'postal station', which has:
Pens
Markers
Envelopes of multiple sizes
Thank you notes (see my how-to here)
Business Flyer
Return Address labels
Wide Tape that never leaves this basket so I always know where it is.
Craft freebie magnets(see here)
Bubble wrap
Velvet gift bags
Zip lock bags


Having all these things easily to hand makes life so much easier, especially when I get a few orders in the same day. Also I've kept the colour scheme consistent with my logo, the blue is carried through from the flyer, thank you note, the sticker on the envelope with my logo, the logo on the promo magnet and even the blue in the return address labels. This is to reinforce my brand and also to give a slick professional appearance. I make sure to keep these extra touches to a minimum though so that it doesn't hike up my costs. I've bought lots of stuff on Etsy over the years and it really makes a difference, the shopping experience becomes even more special. Bonzie and Magpie and Button are two people who pop into my mind who went the extra step and really personalised their packaging. If this is a selling point in your pieces it wouldn't be a bad idea to put a photo of your wrapping/parceling in your last listing image like Balanced does.

Thanks again to Ruth for allowing us to re-use her article - very informative!
If anyone else would like to share their knowledge, experience or advice with us please contact me through my Etsy Shop Cari Design.
Thanks
Caroline
I would like to thank the lovely Ruth from Nice Day Designs for allowing me to republish some of her articles/tutorials - they are full of useful information and advice
Enjoy!
Packaging Orders


As much as possible I try to make systems for all of my work so that things run smoother. I'm not naturally inclined towards being organised so I've spent years training myself to do this to try to make running a business less stressful. When I first started selling on Etsy getting orders was both very exciting and hugely time consuming. The first few orders I got, I had to walk down town to buy packaging, then spend ages rooting out the Sellotape. Thankfully things have changed, now I have what I like to call my 'postal station', which has:
Pens
Markers
Envelopes of multiple sizes
Thank you notes (see my how-to here)
Business Flyer
Return Address labels
Wide Tape that never leaves this basket so I always know where it is.
Craft freebie magnets(see here)
Bubble wrap
Velvet gift bags
Zip lock bags


Having all these things easily to hand makes life so much easier, especially when I get a few orders in the same day. Also I've kept the colour scheme consistent with my logo, the blue is carried through from the flyer, thank you note, the sticker on the envelope with my logo, the logo on the promo magnet and even the blue in the return address labels. This is to reinforce my brand and also to give a slick professional appearance. I make sure to keep these extra touches to a minimum though so that it doesn't hike up my costs. I've bought lots of stuff on Etsy over the years and it really makes a difference, the shopping experience becomes even more special. Bonzie and Magpie and Button are two people who pop into my mind who went the extra step and really personalised their packaging. If this is a selling point in your pieces it wouldn't be a bad idea to put a photo of your wrapping/parceling in your last listing image like Balanced does.

Thanks again to Ruth for allowing us to re-use her article - very informative!
If anyone else would like to share their knowledge, experience or advice with us please contact me through my Etsy Shop Cari Design.
Thanks
Caroline
Tuesday, 31 January 2012
Hello
Hi everyone. My name is Caroline Kelly from Cari Design and I am the new Etsy Ireland Blog Co-ordinator!! (I am liking the sound of my new 'title'!!) And here I am so you all know who you are in touch with.
 I am relatively new to the wonderful world of blogging so please bear with me if there are any (hopefully small) errors! I am keen and eager to get going so if any of you would like to contribute an article to the Etsy Ireland Blog please contact me through my Etsy shop Cari Design. Please let me know the topic of the piece, a good time for me to post it for you and an email address in your message.
I promise to try and keep things interesting from my end and hopefully you all out there will have some really fascinating and crafty news items for me!
That is it for my first post. Looking forward to hearing from lots of you soon.
Thanks for reading!
Caroline
Cari Design
I am relatively new to the wonderful world of blogging so please bear with me if there are any (hopefully small) errors! I am keen and eager to get going so if any of you would like to contribute an article to the Etsy Ireland Blog please contact me through my Etsy shop Cari Design. Please let me know the topic of the piece, a good time for me to post it for you and an email address in your message.
I promise to try and keep things interesting from my end and hopefully you all out there will have some really fascinating and crafty news items for me!
That is it for my first post. Looking forward to hearing from lots of you soon.
Thanks for reading!
Caroline
Cari Design

Tuesday, 21 December 2010
New Members
Another week another group of new members with fabulous shops waiting to be browsed. Don't forget to leave a few hearts & share the love.
 Above from left to right:
Original Mixed Media - Vera by Paula McGurdy;
Arrested Development Elf Coat by Réaltín Coats;
Swarovski Voodoo Skull Tiara by Skull Pixie
 Above from left to right:
Upcycled Red & Black Tartan Pleated Bag with Gray Tweed Bow by The Bow Makers;
Large Terracotta Buttons by KaroArt;
Little Boy Blue - Baby Hat & Mittens by Cari Designs
A huge warm welcome to all of you, wishing you lots of sales & fun on Etsy. Until next time....
Subscribe to:
Posts (Atom)