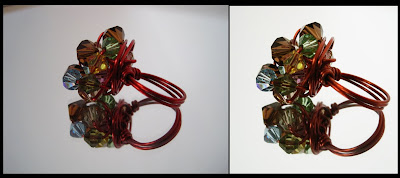
 As always people are talking a lot lately about photography and how to get good product shots. Now I don't claim to be an expert but I may have a few handy tips that might help you out along the way. There also tonnes of really good resourses onthe Etsy forums, just do a search of the titles.
One good place to start is to research your area on Etsy, see what other sellers are doing in your catagory, so what works and what doesn't and try to avoid the mistakes that others have made. This can be a good way of figuring out the style and feel of the photographs that you want. I think people often don't know what they want until they see what they don't like. Some questions to ask. Do I want to use a model? Do I want a plain background? Do I want the pictures to be fun/bright or moody?
Any of the Irish sellers I've been talking to recently have said that they've struggled with light in the gloomy Winter months. I've now made a rule that I don't photograph after 2pm, it may look bright but for a camera there just isn't enough light this time of year to take good shots. The number on rule is NEVER use your flash, ever ever! It will destroy the colours of your item and make it look flat and mawkish.
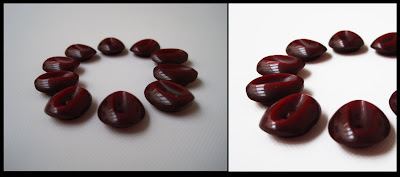 You don't have to have an amazing camera to take crisp pictures. I used to have a beautiful super duper posh camera until we were burgled and now I'm working with a basic point and click Canon IXUS, it set me back 200 euro and it does exactly what I need it to do. Obviously it makes life a lot easier with a good camera, and you will get phtotos that look that little bit better, but it's not the huge hindrance people think it is.
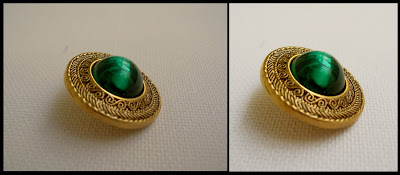 The products I'm usually taking pictures of are small so I always have the macro setting on (that's the button of the little flower your camera has). All camera have this setting, some lenses are better than others, play around with yours and see what your camera is capable of. When you are taking close up shots it's essential that you have this setting clicked, or your photos won't be crisp and in focus. I also have my ISO set at 200, and usually I have the shooting mode set to vivid to try to combat the grey daylight. I never use extra lighting as it adds a yellow cast to the colour of your photos. You can buy white bulbs in photography shops, but as yet I've never needed one.
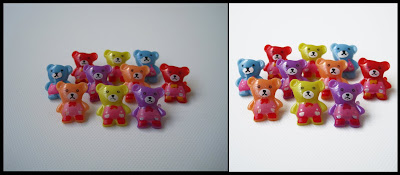 Remember to take you time when taking the shops, if you are using a cheap camera make sure you are very stable when shooting the image or you will get camera shake. I tend to place my elbows on the table. Or small table top tripods can be very handy for this. I also try to keep in mind that the image will have to be cropped to a square for the thumbnail on Etsy. At the start I was very frustrated at having to crop nicely composed photos, now I automatically gear the images to this format. I usually take 6 shots of each item. A couple of arty interesting shots for the listing, and then others that show the basics of the object, like the back/clasp/underside. Here is where all that research comes in for the arty shots. It will help you decide what you want to do for your 'magazine' photo. Lately I've started doing playful things with the background, when I was phtographing a friends jewellery I placed them on a mirror so it looked extra luxurious.
After taking the pictures your next stop is photoshop, which is your best friend if your camera isn't too good. I try to take my pictures on a background that is a very different colour from my object, it makes this stage far easier. Here are a few steps that i put every picture through:
Go to Image>Adjustments>Replace Colour : then high light the background colour, adjuest the fussiness level until you have most of the background but not your object, and increase the brightness. Try not to bleach out your shadows, and don't make it look too unreal.
Go to Image>Adjustments>Brightness/Contrast : I push the brightness up a little bit if the image is a little grey, the contrast helps here too. If the vivid setting on the camera has over saturated the colours I can take down the contrast a little here
Lastly use the crop tool (the tool on the left 5th from the top that looks like 2 set squares put together). In the grey bar at the top I type in my measurements of 25cm x 25cm with 72 dpi, and that means that all my images will be a uniform shape. It's very important that you do this step last after all of your changes as you are decreasing the image size/quality so much it makes it difficult to work with afterwards.
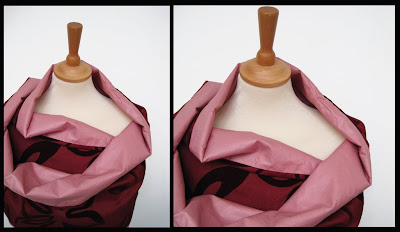 There are lots of other things you can do with a stubbourn image like using the clone too to get rid on marks or dust. Or using colour adjustment to get rid of a yellow cast, but i rarely have to do this. As I said this isn't the complete guide to phtography just a few things that have helped me get a better piture over the past while. I've included some before and after shots of images from my own shop and from friends whose photograghy I did. The jewellery is from DBDesigns and the scarves from Farapinalia, and obviously the buttons ar mine from Nice Day Supplies
 Ps:sorry if there are a tonne of spelling mistakes, I'll check it later, I've to run to work...agh late!

Thank you Ruth, that was really helpful! Such a talented gal! I'm finding it really difficult to photograph at the moment as I finish my day job at 5 and it's so dull by then, so I'm packing all my photography into weekend mornings! It's great to have a few tips to make more efficient use of that time - thanks again!
ReplyDeletegreat post, thanks! one of these days i'll get around to trying some of the tips and reshooting my shop!
ReplyDeleteGreat tips Ruth and wonderful crisp photography!
ReplyDeleteI struggled with my photographs initially but now have found the perfect setting for my pieces - my living room window which is always bright even on the gloomiest of days. I always use the nature setting without a flash - i find everything comes up really nice and crisp with that.
I can't recommend Picasa enough - its a photo editing programme which is super easy to use, very quick and its totally free!
http://picasa.google.com/
Thanks Ruth. I have to say photos are the thing I really struggle with. I'm going to try your tips on my next batch of pics, hopefully things will look brighter and better.
ReplyDeleteThanks Ruth for your very helpful article. I've come to realise that you really need to plan your photography and take your time. I had some great snapshots, but usually, to get a good shot, it takes about 20 awful ones, lol. So, time and patience is a big ingredient to get good photograhy.
ReplyDeleteAs to using flash, I sometimes do, because some spots in my place just require a flash, or else the image comes out really blurred. However, I try to hold the camera so that the flash doesn't hit the product directly, but either flashes above or below it. And to balance out the flash pictures, I put up a flash pic and one outside pic so that the customer can see how a product looks inside and outside.
A friend of mine says that I should really model my knitwear on real people (or myself), but I am undecided on it. What do people here think? Do they find that their products sell better if they show them on real people and not just mannequins (or teddy bears in my case)?
Thanks Ruth - I too have the perfect setting like Tanya Mc - my sitting room window - its like a mini studio - photography and updating my etsy etc is confined to Saturday & Sunday mornings!!boooo to dodgey Irish light! :(
ReplyDeleteGreat topic. I'm gonna have a good read through this later. Looks brilliant
ReplyDeleteThis comment has been removed by the author.
ReplyDeleteThanks Ruth this is great help as my problem is getting the right picture as we all know end of the day the picture sell the product ,
ReplyDeleteCheers
very good advice here. I'm only now beginning to get the hang of things with photography. Using The Gimp to edit pictures is free and not too difficult. would recomend it for sure.
ReplyDeleteI have often tried to convince others on the forums that they can get great pictures with photo manip, but it usually falls on deaf ears. I find that as long as it's in focus, I can fix almost anything!
ReplyDeleteGreat tutorial!
Hey!! this is GREAT! Thanks very much! It's so tricky to get that nice "magazine" look as you called it!
ReplyDeleteGreat tips...
Hayley
:)
This is fantastic! clear and to the point! I also love the apple blossom background on the blog!
ReplyDeleteWow, what a fantastic response!!!
ReplyDeleteThanks everyone, I'm so glad it was helpful.
Tanya-yep getting it down to a routine is key. I used to hate having to do my phtos, now I take then in the mornig, list a few things, and still have lots of time to make things later in the day. It used to be such a core, but practice has made me far quicker.
Purls- I had this issue when I sold clothes. Getting models can be difficult and time consuming, but it does make for a much better picture. I wouldn't try to get every item with a model but a few might mean more exposure in treasuries etc.
Jessamyn- you're so right! Focus is key, after that photoshop is magic. I always want my photos to look real(ie look like the product in colour and texture etc) but at the same time bright and crisp.
I've struggled a long time with my photos. A lot of your tips sound like they will help me out! I've got a good Nikon camera but still struggle to get the crisp look I want. I don't know where you are based but if ever you plan a get-together to informally trade photography tips like these (ie everyone bring their cameras/products and learn how to photograph for blogging/etsy) that would be cool!
ReplyDelete