Wednesday, 31 March 2010

I'll Show You Mine

Hi guys,
We are absolutely chuffed to be contributing to the Etsy Ireland Blog, it's a really exciting development having sold on etsy for a couple of years now to see the Irish Etsy community growing. My name is Yvonne and my Aunties name is Ger and together we make up the etsy design duo "bonzie". We came upon the Irish Team recently and jumped at the chance to join in the fun, we are looking forward to meeting you guys at one of the next meet ups and hopefully contributing in whatever way we can to help the team! We are excited to begin with a studio tour on the blog, and hope that you enjoy our creative space.

Above is a recent book cover in the US by Jo Packham and Jenny Doh where our wee Irish studio was featured, we were contributing artists in the book and have been over the moon to reach the cover too!

Here's Ger at work on one of our "coquette" scarves, I'm a little camera shy so poor Ger ends up in most of the pics! lol

The walls of the studio are adorned with antiquated bits and bobs, I like to collect trinkets and flippery and create a nice environment to work in, we feel a bit more inspired if the area is full of interesting bits and bobs.


Here's the shelved area for all of the fabric storage, truth be known its never quite this tidy and I'm not sure it will ever be that tidy again! I also collect vintage sewing machines, I think they look really pretty and you can see a couple here amongst the shelving.


Here's a picture of the cutting table. My father made this from scratch and it's by far my most treasured studio item. I love that we are creating with our hands on something that my father created for us by hand!


The studio itself is a large wooden cabin style shed, we gave it a wee makeover to take the shed look off it. Flooring, some cosmetic work, insulation the works. However, that been said its still a little chilly in our Irish Winters as you all well know!!

I love to find objects or pieces of furniture and do them up to suit the space. Both of the french looking dressers here were finds that have been shabby chic'd up to suit the studio decor. The taller dresser is covered in vintage pattern paper to give it an antique look. I really enjoy the freedom in the studio to do whatever one wants! Not sure I would get away with that kind of tom foolery in my house aswell! lol

It's been a pleasure showing you all our studio, we are looking forward to getting to know you guys and also seeing into your creative spaces too. :)
Thanks to Ruth and Alex for introducing us to the blog and helping us set up our membership, we are truly proud to be Irish Etsy Team Members now and look forward to our future together. ( insert olé, olé, olé here! lol)
All our Love
Yvonne and Ger


Tuesday, 30 March 2010

How To Tuesday - eNewsletters and building relationships with valued customers and prospects

Hello CraftyIreland friends! This week’s ‘How To’ is going to focus on building a mailing list, in order to build relationships with existing valued customers and prospects through email newsletters (eNewsletters).

Existing valued customers: These are the people who have bought your creations, and they are incredibly valuable to your business. By using an eNewsletter to build a relationship with a customer you can not only receive repeat business, but also referrals. As the saying goes ‘It's easier to keep a client than find a new one.’
Prospects: A prospect is marketing speak for a potential customer. We meet people (whether online or in person) every day who are prospects and it can take a bit of time and relationship building before they are ready to become a customer.

Building long-term relationships with customers is essential for small businesses like ours and sending an eNewsletter is a great way to do this, in order to convert a prospect into a customer; as well as getting repeat business and referrals.

Important note: it’s really important to get a person’s permission BEFORE you add them to your mailing list.

Building your mailing list
This is a continual process, and it’s pretty easy to do (although it can be slow going):
1. If you sell your creations at markets you could have a mailing list sign-up form at your stall/table for visitors to fill in.
2. When you make a sale on Etsy, you can include a question in your ‘thank you’ convo along the lines of ‘... I send an email to my customers once a month, with information about special offers - would you like to receive it?’
3. If you plan on sending eNewsletters via one of the many email marketing providers that are out there (more of which later) an online sign-up form is usually included, which you can link to from your Etsy shop; Facebook; blog; personal website etc.
4. Make sure you capture details such as: first name, surname, email address, country, date of sign up, where they signed up and whether they are a ‘prospect’ or ‘existing valued customer’.

Managing your mailing list
1. You can manage your mailing list in Excel (or similar spreadsheet software) or as a ‘group’ in your email provider (Outlook, Gmail, Hotmail etc). There are also database systems available to purchase, but in the early stages a spreadsheet should suffice.
2. You can choose to segment your list into groups, if you want to send different information to different people (for example: to people in different countries, customers vs prospects) - this is why it’s important to capture as much information as possible at the sign-up stage. Segmenting becomes more important as your mailing list grows, therefore initially it may make sense to send the same email to everyone on the list.
3. Keep your mailing list up-to-date: if you get a returned email (known as a ‘bounce back’) due to an incorrect email address, then remove that email address from the list; if someone requests to be ‘unsubscribed’ (to not receive future emails) it’s important to respect this and update your list accordingly and in a timely manner. If you use an email marketing provider for your eNewsletter they will most likely have an auto-unsubscribe function built into their system, which will manage this for you (however you should cross-check this against your spreadsheet in the event of changing email providers in the future).

Creating an eNewsletter
1. You can create an eNewsletter using the regular email provider that you use for your business (in which case the newsletter will be a basic text email with some links and most likely no images) or through an email marketing provider (in which case the newsletter will be created using a HTML template and will be available as a HTML or text email, and can contain images, links and your shop’s branding)
2. If you choose the latter then you will need to do a bit of research to find an email marketing provider that will meet your needs (google ‘email marketing’ and you will find a long list of providers). There are lots of them out there and some charge for the creation of an eNewsletter template and to send emails. There are free providers out there though, such as Mail Chimp, who I discovered a few months ago through the Etsy forums. With Mail Chimp you can brand the eNewsletter template with your shop banner, add images and (best of all!) you don’t need to have any HTML knowledge to create the email.
3. It’s a good idea to put a schedule in place for when you are going to send your eNewsletter - if you’ve asked people to sign up to receive one then you need to commit to sending it on around about the same date each month (or week/fortnight depending on the frequency you have decided on) - this is important in building that relationship with your prospects and valued customers.
4. The content of your eNewsletter could include: introduction to new items in your shop; an exclusive competition or discount for subscribers; an article from your blog; a survey to ask what your customers would like to see more of in your shop (some email providers offer easy to use surveys with their eNewsletters) etc. Try and put some of your personality into the content & remember that you’re trying to build a relationship with the recipient, so keep it interesting and relevant: the recipients signed up to receive updates on your shop and creations, so it’s a good idea to keep the content focused around that.
5. Privacy: If you are using your regular email provider to send your eNewsletter as a 'group' email it is essential that you put the people on your mailing list's email addresses into the 'bcc' (blind copy) address line - you would be breaching a person's privacy by exposing their email address to other recipients.
6. Personalisation: One of the benefits of using an email marketing provider is that you can easily personalise subject lines and 'to' lines with the recipient's name, which is a nice touch.
7. Spell-check and testing: It is so important that your content is professional looking, and checking for spelling, punctuation and formatting errors is essential. Before you send your eNewsletter print it out to proof read it (and ideally get someone else to proof it also) and send a copy of it to your own email to test the functionality and appearance of it: check the email subject line, content, images (are they appearing correctly), links (are they all linking to the correct location?), formatting (is everything aligned correctly?)

If you have any questions about this article please feel free to contact me.
Judith ♥
A Box For My Treasure

Monday, 29 March 2010

Introducing Monday.....artysmarty!

Hola! Angela from artysmarty with you this week to give you a bit of a spiel about some of my own crafty stuff. I have been living and working in Dublin on and off for about 10 years but am originally from Tasmania in Australia where I studied ceramics. My work has taken a bit of a side step from my original training but I can't help it...I love everything crafty and it's easy to get side tracked. My current special subjects are wood-cut badges, bags and pendants.

You may have seen some of these about Dublin town, I am selling in MayFly (next to the Cake Cafe off Camden Street), Irish Design Shop, Se Si and Om Diva and also at the Dublin Flea Market which happens in the Co-Op in New Market Square the last Sunday of each month.

Lots of my bits and pieces are badges that are made from wood that are laser cut. The material is so flexible, you can cut it, glue it, pierce it and re-cycle it (if things go horribly wrong!). My current favourite is this lady that I use for a badge. She is cool in her nanna underwear.


I am currently working on some lovely bags, phone and business accessories. You know, the kind of stuff that girls love and boys often scratch their heads and say 'But, why do you need it?'


My only concession to my ceramics background is some of the pendants that I produce, made with a clay backing, image transfer and top glaze. I love that they are a fun, non-precious piece of jewelery that's affordable.


Anyhoo, that's about it really. If you like the stuff or just wnat check out my web site for a bit of a nosey, take a look at www.artysmartyshop.com!

Social Networking for Etsy Ireland


Things are moving along nicely here at the Etsy Ireland Team. As of late we noticed a demand for the team to be on visible on other flatforms other than this blog, so we put the word out asking for volunteers to help out with a Twitter and Facebook fanpage. Ooakie has been good enough to take on doing the twitter account for the team, doing regular updates and links to the blog. We had thought of doing twitpix, but it might be simpler if team images were kept to the facebook account. The team twitter account is already up and running, go check it out and start following


Irishwoolen volunteered to work on the facebook fanpage, and we need your products images to get things rolling. Also send a very short shop bio with your images, and all your necessary links to shops, blog, twitter, and facebook. I'd say maximum 10 images would be enough to start with, we don't want to give her too much extra work. Please email your images as attachments to Caroloine at etsyireland@gmail.com, also try not to have huge file sizes please. We'll post the link as soon as the facebook page is active so you can all fan and share it.

Also while we are on the subject of team forums, you may not have noticed but we have a flickr group . Once you have a flickr account, all you have to do is click the link and join the group, then you can add your images to the group pool, you will see the 'add something' option. I'm not sure what benifit flickr has as I'm very new to it, but maybe if you have had a good experience on the site let us know in the comments below.
Also if any of you have your own fanpages, or if you twitter leave links here in the comments so we can share and follow. I succumbed today to twitter...goodbye life!

Saturday, 27 March 2010

Eyes Open Ireland

This weeks images come from Rene of Placed

"[These photos were] taken on the Fanad Penninsula in Donegal. The house (black building) has won some architecture awards. We stay in a house next to it – the location/name of which I am keeping top secret as I do not want to have to compete with too many people to get it booked. This peninsula is fabulous, breathtaking and a total escape from busy city lives. It is our family’s retreat and we love it, walking on the deserted beach in pyjamas is my idea of happiness!"


The sandy beach is Portsalon, which we pass through on our way to our secret hideaway!


www.placed.etsy.com            www.placed.ie

Friday, 26 March 2010

Thursday, 25 March 2010

Showcase Art/Illustration

If any of you have a minute, check out today's showcase Art/illustration section, I put some work up for today.

http://www.etsy.com/showcase.php

Let me know what you think!

Yvonne

Designs for Etsy Ireland Business Cards


At the last team meeting we were talking about getting Etsy Ireland business cards. But the main problem was how to fund this, we were all a bit reticent about paying for cards as a group, or then maybe having to divide the costs. So the solution we came up with was to design a couple of cards, upload them to Flickr, and then whoever wants them can print them themselves, at their own expense. It seemed like the fairest way of doing it. So far I've designed 2 one side business cards, that you can either print at home of bring the file to a commercial printer. I also plan to do a few designs for the Moo minicard format at the sell them in sets of a hundred. I think the cards would be great if people included them in their Etsy orders, or gave them out at craft fairs, or to friends and family.

I did two very different designs, so you can choose which matches your products more. People are more than welcome to do more designs and upload them to flickr, I just thought I would get the ball rolling first. So click here to download the 'Romantic' card, or here for the 'Modern' card.

Full Circle - Irish Traditional Crafts

Chapter 2 - Natural Dyes and a taste of hand Knitting

When I left you at the end of Chapter 1, I had spent some time on Clare Island (off the west coast) and had spun some amazing yarn from the local sheep. So now I had skeins of spun wool and while the natural colour appealed for many projects, it was time to add a little colour.....

For centuries natural dyes have been extracted from roots, stems, leaves, berries and flowers as well as from shell fish and insects and often the formulae were closely guarded secrets handed down through families. One of the most prolific dye sources are lichens which are plant organisms made up of fungus and algae and are usually grey, green or yellow in colour. Traditionally it was the childrens job, after a shower of rain, to collect the wet lichens and, as it was thought to be unlucky for any man to touch the dye pot, only women would dye the wool and cloth.

For the purpose of my learning curve I was brought through the process of dyeing the new spun wool with onion skins. First a full pot of the skins, half filled with water is brought to the boil on the stove. The unwound skein of wool is wet thoroughly, alum is added to the water to fix the dye and, once soaked, it is put into the hot pot and simmered gently for up to an hour.

The skeins are then rinced gently and put outside on the wall to dry in the sun. Further skeins of wool can be added to the pot, undergo the same process and each will come out a lighter shade of orange/yellow. The results are amazing.

Once your yarn is dried and wound it is ready to be transformed. My grandmother would use some of the undyed wool to make socks and jumpers for the family. The remainder would be send to the local weaver to make blankets (more on weaving in a later article).

Below is a cushin cover I knit using some traditional aran stitches i.e. cables and blackberry. In my next article I will explore the origins of handknitting in Ireland and also have a look at the weaving of the multicoloured sash or belt known as the crios.

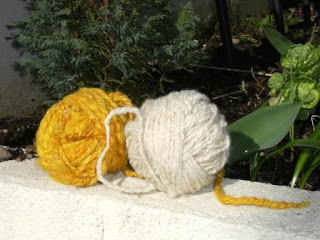
As always I welcome any comments on this article and ideas for future explorations. If you are a crafter who would like to be linked to any of the series of articles please let me know.

Till we meet again, take care.

Mo
aka http://www.huggleknits.etsy.com/

Next article due 29 April.........

Wednesday, 24 March 2010

A Great Market Opportunity in the North

I am taking part in this market and the organisers have asked me if anyone else is interested. It is over Easter Sunday and Monday and takes place in the grounds of Castle Ward which is a beautiful National Trust owned house situated in Co. Down. 

The event attracts 7000+ visitors every year and I've heard the market is a great success for anyone taking part. I'm hoping so anyway! It costs £45 per day which may seem expensive, but I'm sure you can share a stall and split the costs. 

See here for more info about the house and HERE for info about the easter event. If you are interested you need to get your skates on, final applications are next wednesday. You need to email Carole at carole.crozier[at!]nationaltrust.org.uk. I think this is definitely a market worth doing. If you can't do it this time you should email her anyway to be put on the mailing list and get ready for next year! 

There is also an event in October (I think) they are taking applications for now. Good luck!

Etsy front page success for team members

European week on Etsy is in full swing and it's a delight to see a few of the team are making the front page of Etsy. Several success stories today as you can see in the screen grabs below:
Included in this front page collection are IrisOconnor, WeeCuteTreasures, BridgetFarmerPrints and Placed.

The second success story of the day is this front page collection which includes BridBird (Bridget Farmer, you are on fire!!), Crafts2Cherish, PatchworkDelights and BagNoir.

Impressive stuff, and fab to see the European side of Etsy shining brightly!

I’ll show you mine

Hi everyone, my name is Laura of Laura Cassidy Design. It was so great to meet so many fellow etsy members at Saturday's meeting in Dublin. When the lovely Ruth of Nice Day Designs and Alex of Propeller asked for volunteers to write on this blog I agreed to do a piece for I'll show you mine.

Welcome to my studio!

I did a little tidy but I thought it best to be realistic about the space I work in!!


Before I go on I will give you a little info about where I am at the moment. I recently moved back from London after living there for ten years. I was working full time and making jewellery in my spare time. I decided it was time for me to move back home to Dublin, so I started to look at jobs and renting a place to live. My sister had recently bought a spanking new gorgeous apartment and she kindly said I could move in and base my studio there! How lucky am I?! So I took the plunge, sold a lot of my belongings at a car boot sale and drove home with my little red corsa full of my possessions (I did have some stuff shipped too!).


So, back to my studio! I love my big table where I do most of my work. When I'm making I like to have everything I need to hand, so I fill the drawers, cupboard and sliding keyboard shelf with the items I use most frequently.


I also have a smaller desk by the window where I like to reflect and get inspired! Some of the time this table gets buried under materials, files, boxes etc but I like working at it when it is tidy!


Storage!!


We crafty people have so much stuff ... but where to put it all? I like knowing where everything is so I hunt for storage ideas, I do love a pretty box!!


I have been known to spend 'quality time' sorting my resources by item and sometimes colour, here are some examples:

I love Swarovski Crystals, so many sparkly colours to choose from!!


I am always on the lookout for beautiful semi precious stones.


My millinery resources, I do like my cases!!


I also have been known for typing and printing labels for my boxes and folders, very anal I know!


At the moment my sister is away on holidays in Australia for three weeks, yes I am jealous but I have taken the opportunity to turn the sitting/dining room into a temporary photography studio! I am desperately trying to improve my photographs so thank you to Ruth for the wonderful and very useful article about photography. Below is a photo of my work waiting to be papped:


And finally, I enjoy relaxing with a cup of tea and browsing this blog and the wonderful etsy.com where there are so many fantastic things to see, buy, read and learn from!!!


Thanks for dropping in, have fun ;-)


Laura

Tuesday, 23 March 2010

How to.....make the most of Etsy Suppliers!

Like all you lovely and talented people out there I love all things Etsy. I especially love Etsy Suppliers in particular. I am one of those very fin-nicky people who like unique items for my crafts and I find Etsy suppliers are usually always there to complete any unusual requests I might have. Today, I'm showing how I made a very simple card using the supplies recently bought from NiceDay Supplies, PackagesandStrings,booksbyjme and BeautifulAdditions
First of all for any card making project, you need to decide what size card you wish to make and if possible what type of card, be it for a birthday, an anniversary or some other occasion. In this instance I am making a birthday card for an old school friend. Once you have selected your card size, score you card through the centre to ensure it folds correctly and neatly.

At this stage, my mind is usually wandering with ideas, how will I layout the card? What colours or themes will I use? I always have scrap pieces of paper to hand and try to recycle them back into new cards as much as possible and here I've found a lavender blue piece that I've decided to incorporate.

Luckily for me the cute design around the edges was already in place from a previous project!
I've decided to bring in the first of my Etsy Suppliers and use a sentiment stamp to make the card a little more meaningful. These little stamps from booksbyjme are really handy. In the past I have bought directly from the stamp suppliers in the U.S but found the cost to be too high! The beauty of buying from the etsy supplier is that they also keep their costs as low as possible! To use a stamp you need an acrylic block, you must peel the stamp off, place it on the block and then chose an ink colour.


In this image, I'm printing using white ink, however I soon changed to black as the white print was not as successful as I had hoped.
I try to personalise my cards as much as possible, so one of my favourite things to do is to incorporate faux stitching using one of my treasured tools....a white gel pen! :)

Next Step - the all important back ground paper! At this stage you can usually find me shifting through huge amounts of paper in my teeny-tiny craft space. I'm a bit of a paper hoarder! Nothing gets thrown away and everything in my eyes has a second, third or forth possibilty!

I've also decided to complete the card using some gorgeous buttons and pins from NiceDay Supplies, twine from PackagesandStrings and pink gingham ribbon from BeautifulAdditions

Once the paper has been cut to the appropriate size, glued down and the ribbon tied in a pretty bow I like to corner the edges of my cards using a small corner puncher. You can buy them from lots of art and supply shops all over Ireland.

For me, layout is really important. I play around with all of my materials before I permanelty stick anything down. Many of my designs have a 3D feel to them and a little tip I use is to place 3D glue dots on the back of the item you wish to raise up from the card. In this case I am popping up the sentiment aspect.

3D glue dots are the easiest things to use and one of my essential items I need to have on a regualr basis. Next stop is to add a bit of funk to my lovely buttons, using the twine I purchased I will tie it through the buttons, again making the card appear as if its been literllay sewn together!

To finish off, I've inserted some complimenting pins from NiceDay Supplies and hey presto we're done!

Thanks for reading! Hope I've inspired a few new potential card makers out there!

Happy Tuesday!